Earlier this year we told you about a new generation of tents that are ditching the traditional domes and triangles for an all-new shape: cubes. And man, you guys found some flaws in that idea. Will the roof pool rain or the sides collapse in high wind? We took one backpacking in Yosemite to find out.
What is it?
The Tensegrity 1 FL tent is an ultralight 1-person, 3-season tent that seeks to minimise weight while maximizing livable space. Traditionally, it’s been one or the other.
To do that, it obviously ditches the dedicated poles, instead relying on now-popular trekking poles. But other tents have done that for years. The real secret here are the vertical sides and front.
It also ditches some traditional tent features. While the sides are a traditional double-wall design where you can zip-close the waterproof fabric behind the mesh body and the foot uses a traditional tiny-vestibule-over-mesh arrangement, the front is more of an open porch than it is an enclosed structure and the roof is single-wall.
Traditional backpacking tents would more typically employ a mesh body with a separate rain-fly stretched over that. This “double-wall” arrangement maximizes ventilation, allowing condensation from your breath and body to escape the tent while dry air is free to flow in. But two layers doubles the weight.
The Tensegrity is available in a few different flavours: there’s one and two-person varieties, as well as “Elite” and “FL” versions, with the former using fancier, lighter fabrics. The Elite costs more money as a result. The Sierra Designs Tensegrity 1 FL we’re reviewing here retails for $US320 and weighs 2lbs, on the nose. The Elite 1P is $US400and drops 5oz.
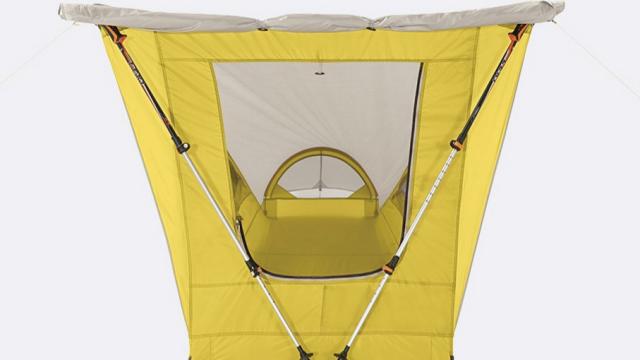
The main door on the right side of this 1P is basically the whole side wall, as is the mesh window on the other side. In addition to that, there’s a window/secondary door in the front wall that opens up to the porch space. Between the ability to open the walls and windows fully, partly open, or open with the mesh closed to keep the bugs out, there are plenty of ventilation options.
Beyond this, there’s a rear hoop pole for the foot area, 9 stakes, 4 guylines, a tent stuff sack and a storage bag for the pole and stakes. This tent pitches with the use of trekking poles, but an optional separate pole set can be purchased if desired. You could substitute sticks of an appropriate length for the two main poles at the top, but in doing so you could be reducing the structure’s resistance to wind while adding hassle and time to the set up.
The size of the packed tent is roughly about 10L, with the pole and stakes bag able to attach to, or be kept separate from the tent. It’s nice that Sierra Designs acknowledges that modern backpackers prefer to carry their tent pole outside their pack and doesn’t feel it necessary to spec a tent bag that’s oversized to accommodate that pole.
Using it
As a backpacker striving for lighter and smaller equipment, the Tensegrity 1 FL is a great option. It joined me on a 4-night trip backpacking in Yosemite National Park. I kept the pole/stakes bag separate, packing them upright in the corner of my pack, and the tent sack close to the bottom, horizontally.
Pitching the tent wasn’t super straight-forward and I ended up I missing a step, even following the instructions on the tag:
- Lay the tent down on a flat surface
- Stake the corners
- Put your extended poles into the corners of the front wall
- Stake the tarp from the middle (which will lift the poles)
- Stake the corners of tarp
- Remove the middle tarp stake
- Adjust guylines
- Put in rear pole in the foot area
Admittedly I didn’t know to remove the middle stake of the tarp (#6) and wondered why the tent didn’t look perfect, but this didn’t hinder its function as a shelter.
From here, there are a few configurations that can turn this shelter from battened down to maximal ventilation in fair weather. Staking the secondary guylines from the corners of the front wall provides the opportunity to roll the tarp up, exposing the mesh-only window. This is great to use during favourable conditions at night for a great view. With a second set of poles (or sticks/things to tie things to) the tarp can become a canopy providing a shaded porch on a sunny day or keeping non-wind-driven rain off your gear.
The trekking poles slide into corner pockets on the top of the front wall, and into the grommet tabs on the bottom, which are adjustable to whichever size poles you’re using — a clever and efficient solution.
The front door/window onto the porch is mesh-only. So, with the canopy staked out, away from it, there’s good ventilation there, along with easy access to your stuff. An arrangement that doesn’t impair access into and out of the door.
But, even with the large mesh side walls zipped partially open, the single wall roof still collected condensation, which got my sleeping bag wet. In cold, but above freezing conditions, this could be a real problem. Particularly if you bag isn’t insulated by water-resistant down.
The floor was a little larger than my sleeping pad and widened towards the top. Having extra space up top made a lot of sense as I was able to change comfortably sitting up. This isn’t something I’ve experienced in minimal backpacking shelters before and I appreciate the engineering — makes it feel like the space is optimised well to reduce needless fabric weight.
Breaking down tent is easy as you just remove all the stakes and poles, stuff the tent into its sack and get back on the trail.
We didn’t experience anything approaching extreme weather on this trip, but the tent kept what little precipitation there was off the vertical sides thanks to its minimal overhangs and the tent didn’t exhibit any signs of being unduly subject to wind. As with any such shelter, you need to orient the foot into the wind to maximise stability.
Staking the porch canopy flush or close to the top of the tent will definitely keep weather out there.
Who’s it for?
The Tensegrity exists in an odd space between much lighter (but also much more spartan) ultralight backpacking shelters and common backpacking tents. I think what’s going on here is that Sierra Designs has identified that even casual backpackers are now moving more ultralight in their approach and both wants to encourage that approach and ease people’s transition into it.
At 2lbs, true ultralighters aren’t going to ditch their tarps for one of these. But, if you’re a regular backpacker looking for a lighter shelter, you use trekking poles and you value bug protection, then the Tensegrity will give you a fully-enclosed structure that’s unprecedentedly livable for a 1p.
Having said that, it’s the 2P version of this design that we feel makes the most sense. There, with a total of four trekking poles, you gain a more easily-erected porch structure that’s now large enough to cook or hangout under in inclement weather, while providing doors on each side to allow easy entry and egress. The weight penalty for scaling up to 2P is minimal too; the FL version weighs just 10oz more and costs $US390. That’s a much sweeter spot for a shelter, providing a better person-to-price-to-weight than this 1P.
The good
- I love how versatile the design is. Open and livable its a nice accompaniment to a group camp in the summer. Battened down, it will keep the weather off. All while providing solid interior space.
- The packed size is impressively small and the fact that I can separate the pole/stakes storage bag from the tent stuff sack made it super easy to pack.
- The weight is low, not as light as others can get, but impressive considering its price point and livability.
- When pitched, the tent stood solid. I personally like using trekking poles as they’re stronger than tent poles.
The bad
- The colour. It’s yellow with a beige top and looks like a giant cheese wedge.
- Moisture was a horrible issue when I used it, no matter how ventilated. And with moisture on the ceiling, the low height of the foot area was a pain as the sleeping bag kept getting wet just lifting my feet an inch.
Should I buy it?
Dedicated ultralighters will be better served by tarps and other unconventional shelters. Casual campers will benefit from a larger, free-standing dome tent.
But, if you’re looking to take weight out of your shelter system without sacrificing liveability or bug protection, the Tensegrity may be a good idea. Particularly if you’re shopping for the 2p.
With the condensation build up, however, we’re reluctant to recommend this tent over our favourite 2P backpacking tent though. The $US400 Big Agnes Copper Spur UL2 is only 2oz heavier, yet is freestanding, larger and better ventilated.
Daniel Bruce Lee is travelling the world exploring mountains and cultures. Follow his adventures on Instagram: @danielbrucelee and Snapchat: danielbrucelee.
Earlier this year we told you about a new generation of tents that are ditching the traditional domes and triangles for an all-new shape: cubes. And man, you guys found some flaws in that idea. Will the roof pool rain or the sides collapse in high wind? We took one backpacking in Yosemite to find out.
What is it?
The Tensegrity 1 FL tent is an ultralight 1-person, 3-season tent that seeks to minimise weight while maximizing livable space. Traditionally, it’s been one or the other.
To do that, it obviously ditches the dedicated poles, instead relying on now-popular trekking poles. But other tents have done that for years. The real secret here are the vertical sides and front.
Advertisement
It also ditches some traditional tent features. While the sides are a traditional double-wall design where you can zip-close the waterproof fabric behind the mesh body and the foot uses a traditional tiny-vestibule-over-mesh arrangement, the front is more of an open porch than it is an enclosed structure and the roof is single-wall.
Traditional backpacking tents would more typically employ a mesh body with a separate rain-fly stretched over that. This “double-wall” arrangement maximizes ventilation, allowing condensation from your breath and body to escape the tent while dry air is free to flow in. But two layers doubles the weight.
The Tensegrity is available in a few different flavours: there’s one and two-person varieties, as well as “Elite” and “FL” versions, with the former using fancier, lighter fabrics. The Elite costs more money as a result. The Sierra Designs Tensegrity 1 FL we’re reviewing here retails for $US320 and weighs 2lbs, on the nose. The Elite 1P is $US400and drops 5oz.
The main door on the right side of this 1P is basically the whole side wall, as is the mesh window on the other side. In addition to that, there’s a window/secondary door in the front wall that opens up to the porch space. Between the ability to open the walls and windows fully, partly open, or open with the mesh closed to keep the bugs out, there are plenty of ventilation options.
Beyond this, there’s a rear hoop pole for the foot area, 9 stakes, 4 guylines, a tent stuff sack and a storage bag for the pole and stakes. This tent pitches with the use of trekking poles, but an optional separate pole set can be purchased if desired. You could substitute sticks of an appropriate length for the two main poles at the top, but in doing so you could be reducing the structure’s resistance to wind while adding hassle and time to the set up.
The size of the packed tent is roughly about 10L, with the pole and stakes bag able to attach to, or be kept separate from the tent. It’s nice that Sierra Designs acknowledges that modern backpackers prefer to carry their tent pole outside their pack and doesn’t feel it necessary to spec a tent bag that’s oversized to accommodate that pole.
Using it
As a backpacker striving for lighter and smaller equipment, the Tensegrity 1 FL is a great option. It joined me on a 4-night trip backpacking in Yosemite National Park. I kept the pole/stakes bag separate, packing them upright in the corner of my pack, and the tent sack close to the bottom, horizontally.
Pitching the tent wasn’t super straight-forward and I ended up I missing a step, even following the instructions on the tag:
- Lay the tent down on a flat surface
- Stake the corners
- Put your extended poles into the corners of the front wall
- Stake the tarp from the middle (which will lift the poles)
- Stake the corners of tarp
- Remove the middle tarp stake
- Adjust guylines
- Put in rear pole in the foot area
Admittedly I didn’t know to remove the middle stake of the tarp (#6) and wondered why the tent didn’t look perfect, but this didn’t hinder its function as a shelter.
From here, there are a few configurations that can turn this shelter from battened down to maximal ventilation in fair weather. Staking the secondary guylines from the corners of the front wall provides the opportunity to roll the tarp up, exposing the mesh-only window. This is great to use during favourable conditions at night for a great view. With a second set of poles (or sticks/things to tie things to) the tarp can become a canopy providing a shaded porch on a sunny day or keeping non-wind-driven rain off your gear.
The trekking poles slide into corner pockets on the top of the front wall, and into the grommet tabs on the bottom, which are adjustable to whichever size poles you’re using — a clever and efficient solution.
The front door/window onto the porch is mesh-only. So, with the canopy staked out, away from it, there’s good ventilation there, along with easy access to your stuff. An arrangement that doesn’t impair access into and out of the door.
But, even with the large mesh side walls zipped partially open, the single wall roof still collected condensation, which got my sleeping bag wet. In cold, but above freezing conditions, this could be a real problem. Particularly if you bag isn’t insulated by water-resistant down.
The floor was a little larger than my sleeping pad and widened towards the top. Having extra space up top made a lot of sense as I was able to change comfortably sitting up. This isn’t something I’ve experienced in minimal backpacking shelters before and I appreciate the engineering — makes it feel like the space is optimised well to reduce needless fabric weight.
Breaking down tent is easy as you just remove all the stakes and poles, stuff the tent into its sack and get back on the trail.
We didn’t experience anything approaching extreme weather on this trip, but the tent kept what little precipitation there was off the vertical sides thanks to its minimal overhangs and the tent didn’t exhibit any signs of being unduly subject to wind. As with any such shelter, you need to orient the foot into the wind to maximise stability.
Staking the porch canopy flush or close to the top of the tent will definitely keep weather out there.
Who’s it for?
The Tensegrity exists in an odd space between much lighter (but also much more spartan) ultralight backpacking shelters and common backpacking tents. I think what’s going on here is that Sierra Designs has identified that even casual backpackers are now moving more ultralight in their approach and both wants to encourage that approach and ease people’s transition into it.
At 2lbs, true ultralighters aren’t going to ditch their tarps for one of these. But, if you’re a regular backpacker looking for a lighter shelter, you use trekking poles and you value bug protection, then the Tensegrity will give you a fully-enclosed structure that’s unprecedentedly livable for a 1p.
Having said that, it’s the 2P version of this design that we feel makes the most sense. There, with a total of four trekking poles, you gain a more easily-erected porch structure that’s now large enough to cook or hangout under in inclement weather, while providing doors on each side to allow easy entry and egress. The weight penalty for scaling up to 2P is minimal too; the FL version weighs just 10oz more and costs $US390. That’s a much sweeter spot for a shelter, providing a better person-to-price-to-weight than this 1P.
The good
- I love how versatile the design is. Open and livable its a nice accompaniment to a group camp in the summer. Battened down, it will keep the weather off. All while providing solid interior space.
- The packed size is impressively small and the fact that I can separate the pole/stakes storage bag from the tent stuff sack made it super easy to pack.
- The weight is low, not as light as others can get, but impressive considering its price point and livability.
- When pitched, the tent stood solid. I personally like using trekking poles as they’re stronger than tent poles.
The bad
- The colour. It’s yellow with a beige top and looks like a giant cheese wedge.
- Moisture was a horrible issue when I used it, no matter how ventilated. And with moisture on the ceiling, the low height of the foot area was a pain as the sleeping bag kept getting wet just lifting my feet an inch.
Should I buy it?
Dedicated ultralighters will be better served by tarps and other unconventional shelters. Casual campers will benefit from a larger, free-standing dome tent.
But, if you’re looking to take weight out of your shelter system without sacrificing liveability or bug protection, the Tensegrity may be a good idea. Particularly if you’re shopping for the 2p.
With the condensation build up, however, we’re reluctant to recommend this tent over our favourite 2P backpacking tent though. The $US400 Big Agnes Copper Spur UL2 is only 2oz heavier, yet is freestanding, larger and better ventilated.
Daniel Bruce Lee is travelling the world exploring mountains and cultures. Follow his adventures on Instagram: @danielbrucelee and Snapchat: danielbrucelee.