
It’s finally here: the feature that I’ve been waiting for since Google introduced it back in 2017 at its Google I/O developer conference. I remember sitting in the crowd at the Shoreline Amphitheater when Sundar Pichai showed off Google Photos’ ability to remove a fence! From a photo of a kid playing baseball! And the rest of the picture remained intact! Such magic! And precisely the kind of thing I needed to deal with my haphazard photography.
It’s been years, and the closest thing we have to that feature is the Pixel 6’s Magic Eraser. And while it certainly tries to capture that fence removal magic, it’s best used for removing folks from the background and leaves from the foreground.
Magic Eraser is available now on Google’s Pixel devices through the Google Photos app. You could try to use it on a non-Pixel device with Android 12 installed, but Google says its Tensor chipset is what makes this feature work as intended.
If you have a Pixel 6 in your possession — or you went the APK route and sideloaded it onto your non-Pixel device — you might be wondering how to get the most use out of this new feature. Well, I went and edited some photos from a recent outing with the Pixel 6 Pro to help walk you through it.
What Does The Magic Eraser Do Exactly?

Magic Eraser works inside the Google Photos app. It detects so-called distractions in your photo, whether it’s an electrical pole or an errant family member. Magic Eraser can remove nearly anything and replace the area with the background as if that object or person never existed. It works similarly to the Spot Removal tool in Adobe Lightroom, but instead of using your mouse and a brush tool to select the area to edit, you can let Google automatically select change to make or use your fingers to highlight the problem areas. And like the Spot Removal tool, it’s not always accurate, as you’ll notice in some of the sample photos.
Let’s Erase Something
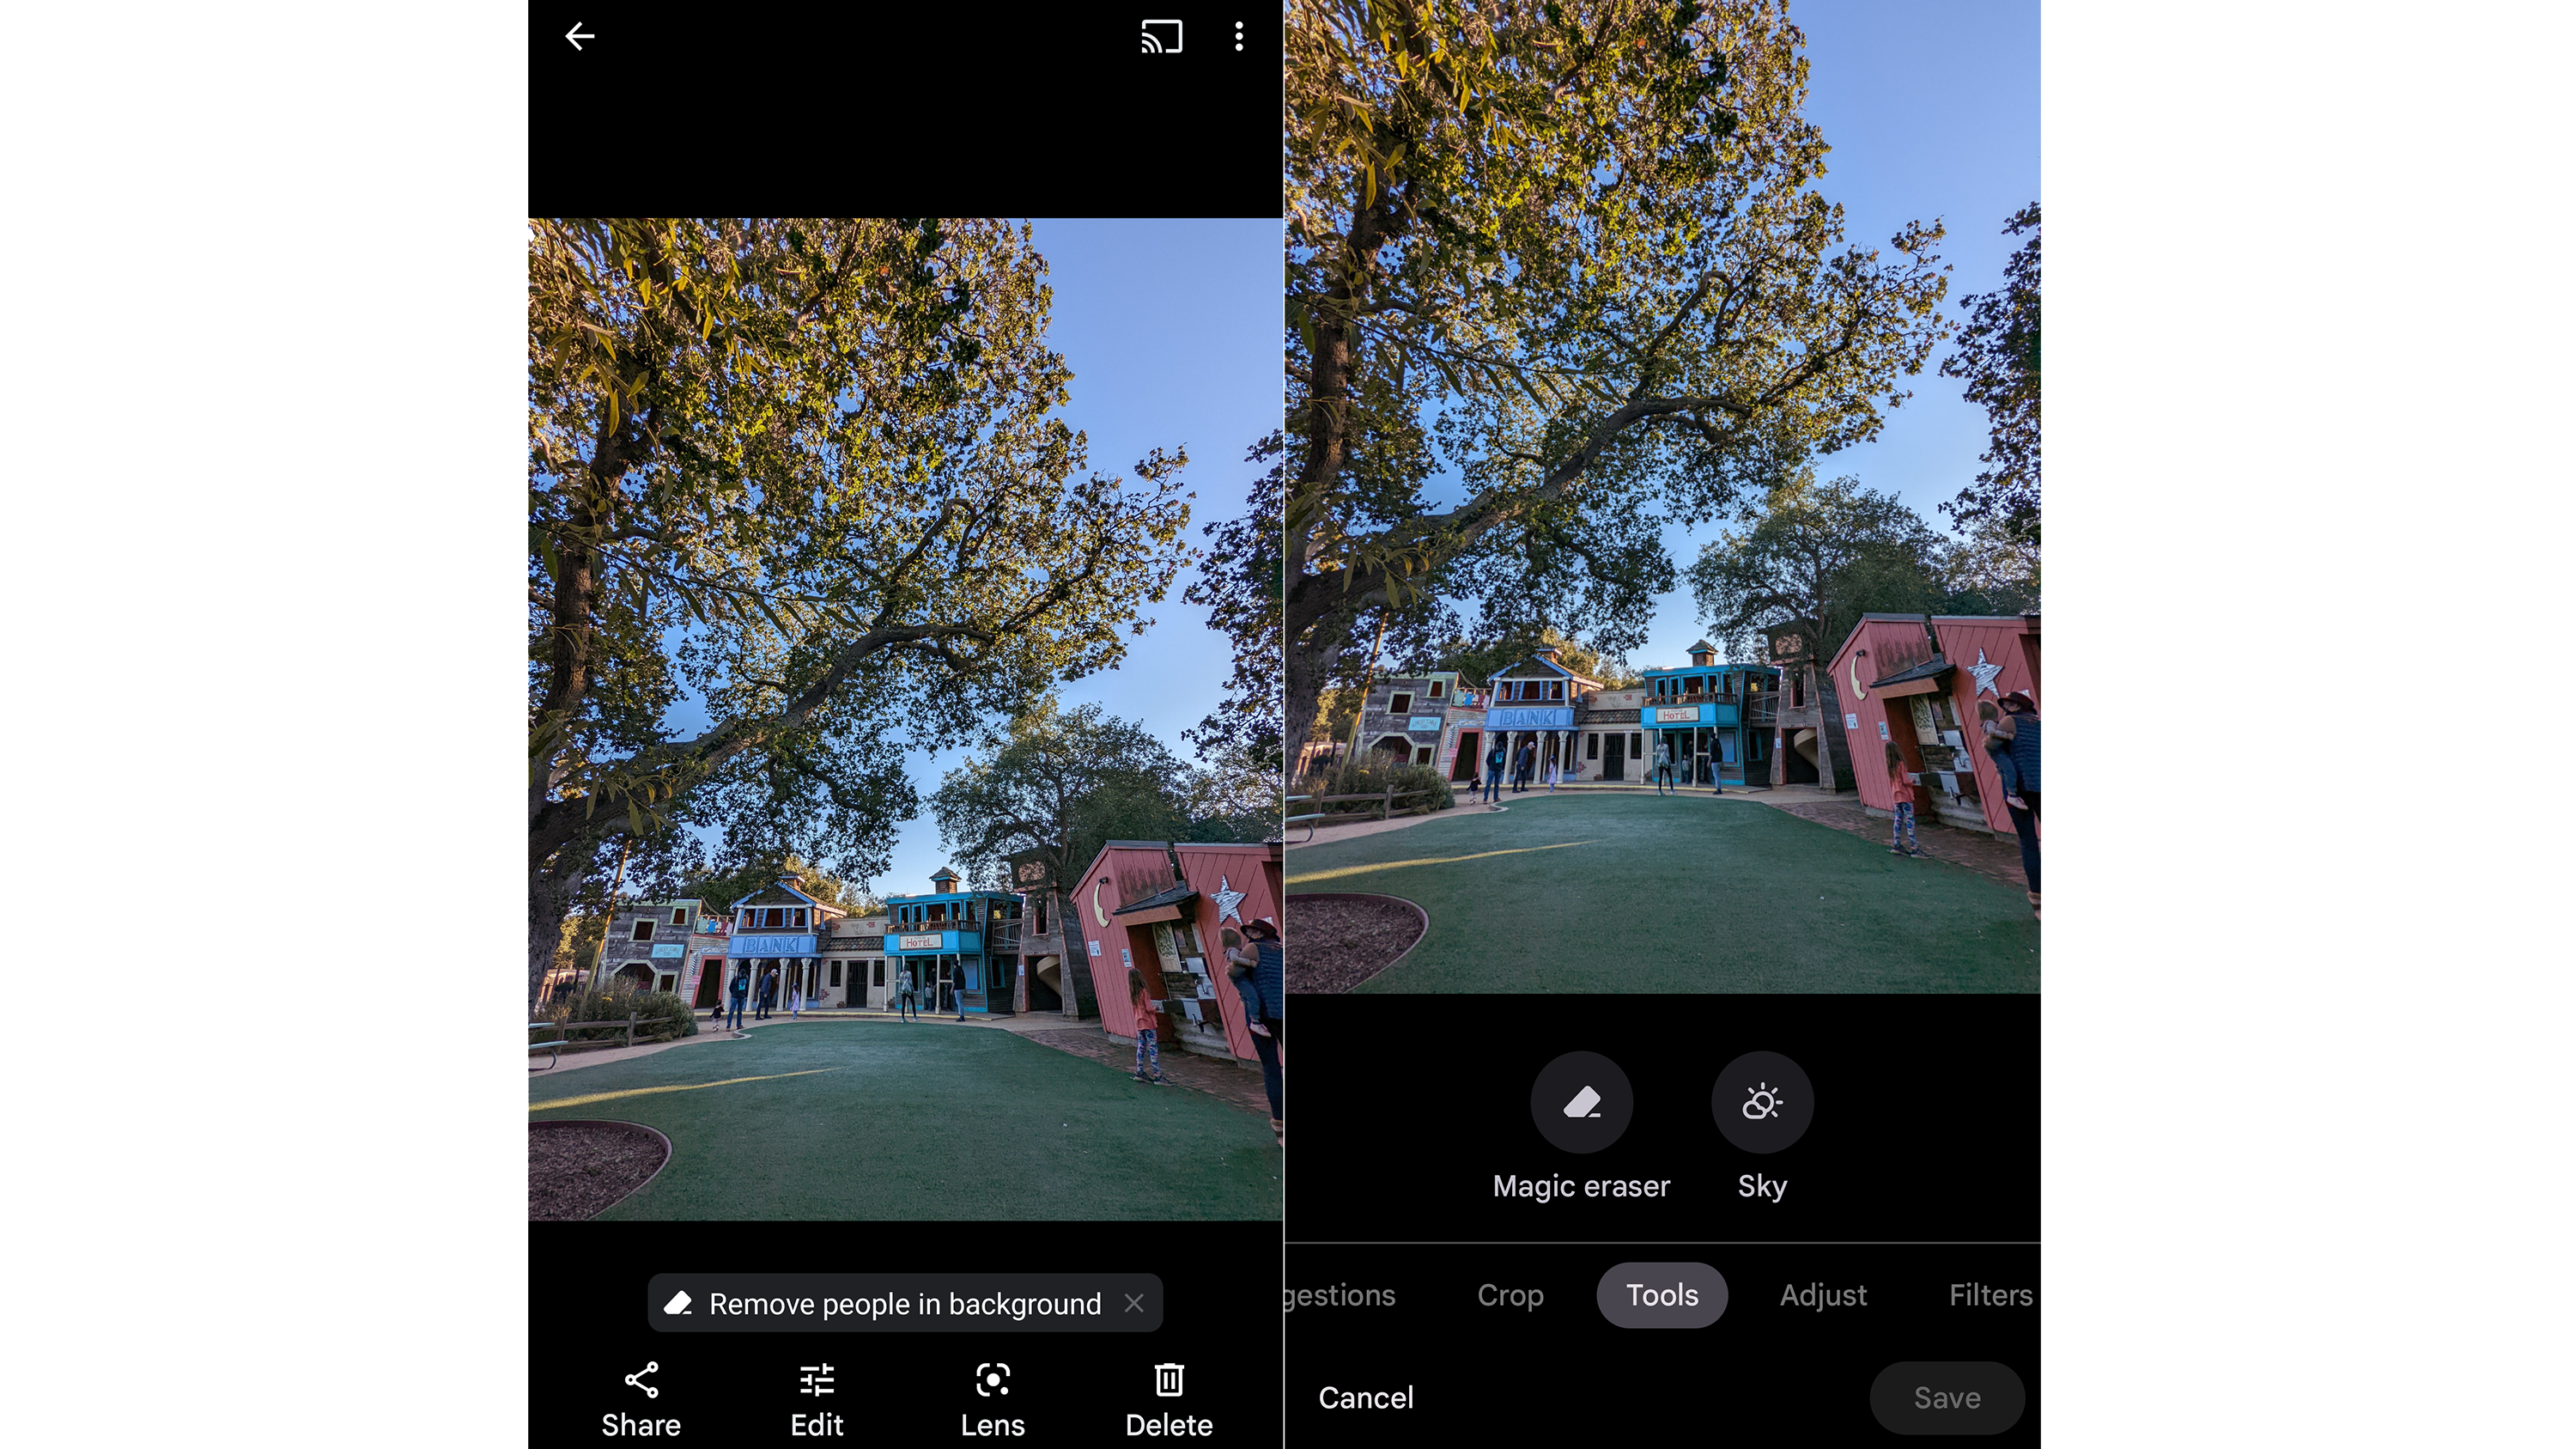
To start, open up a photo in the Google Photos app on your Pixel smartphone. In some cases, Google Photos will offer to automatically remove people from the background in a pop-up prompt, as seen in the first image, and you can tap on the prompt to get started.
Tap on the photo in Google Photos, and then you’ll see a menu pop up below. Select the option to Edit, then scroll over to the Tools option. You’ll see the available options that Photos thinks it can help out with, often including Portrait light, Blur, Magic Eraser, and Colour focus. In some cases, only the Magic Eraser will be available to use on a particular photo.
It’s Easy to Stick With the Suggestion
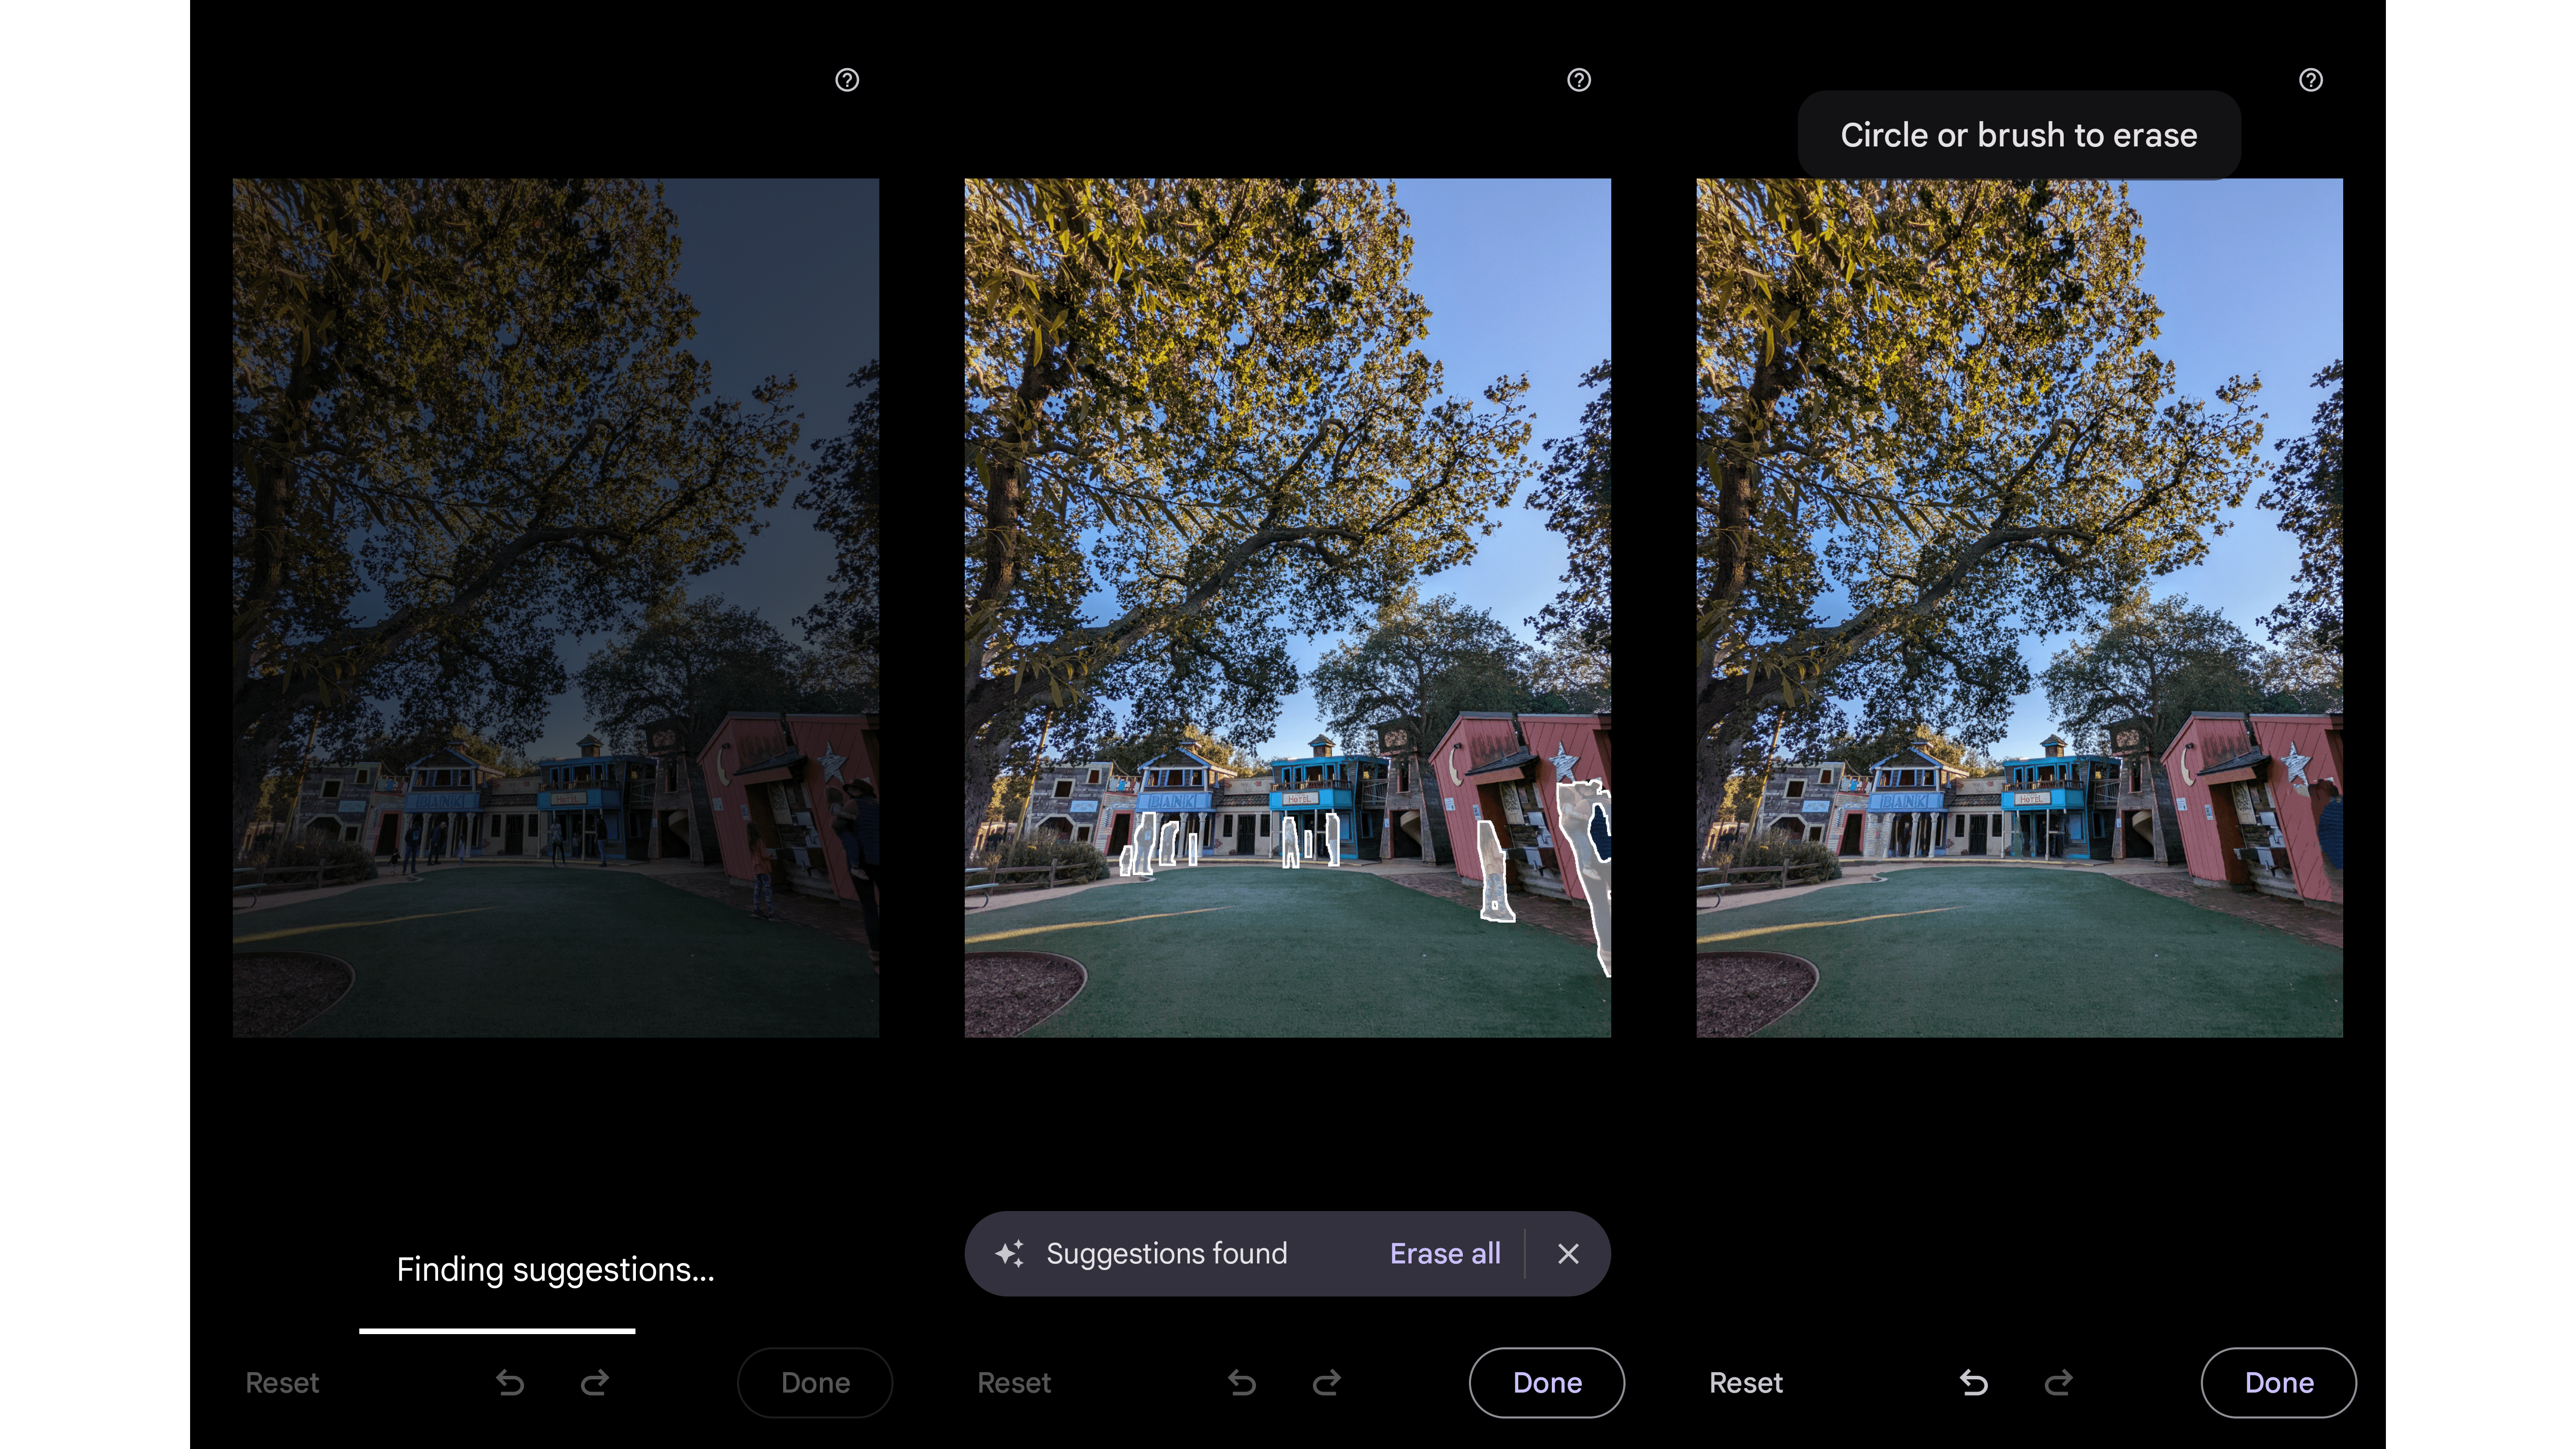
You might find that Google Photos’ suggestion gives you the quickest edit you’re looking for. In a photo like this one, the algorithm managed to pick out only the people’s bodies that I wanted to take out from the image to show the landscape. Once you’ve accepted the Magic Eraser suggestions, you’ll have the option to perform additional extractions.
Although I only tested the Magic Eraser feature with pictures from a particular outing, I noticed the feature works best with prominent backgrounds and against patterns that Photos can easily repeat. (You can easily find some bad examples of the Magic Eraser through a quick search.)
Try Going Manual
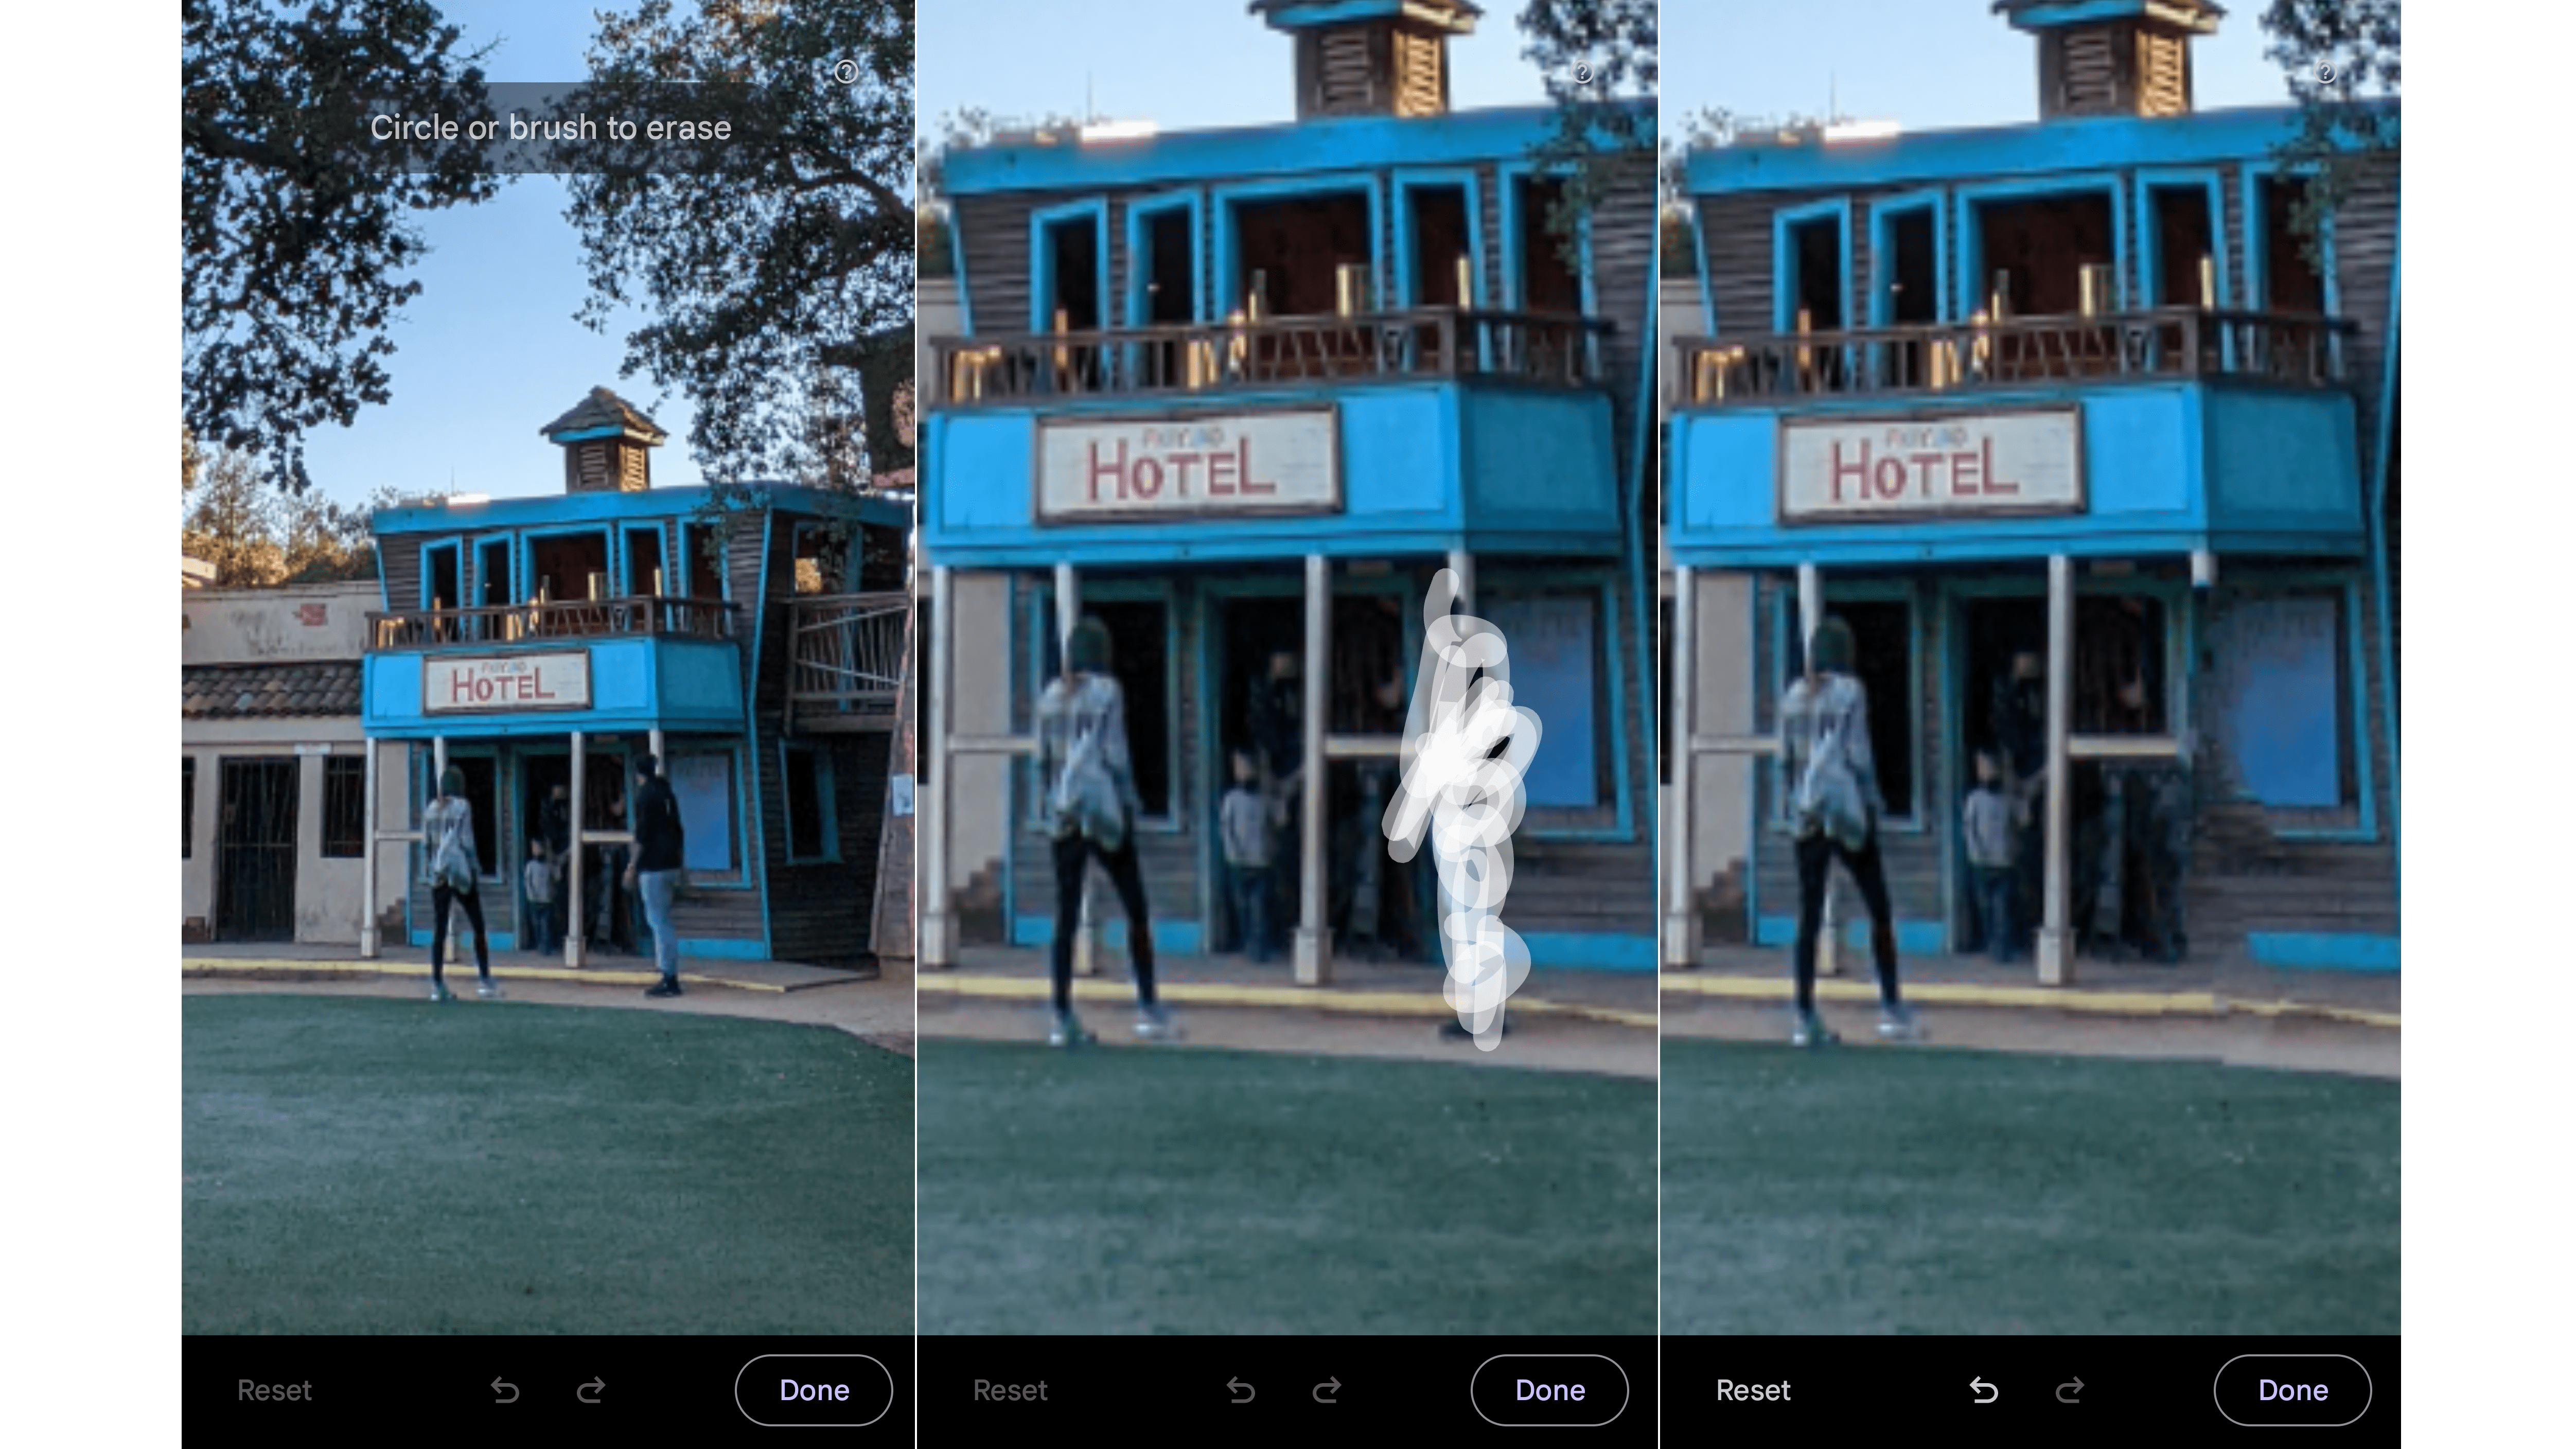
If you decide not to accept Photos’ automatic suggestion for your Magic Eraser edit, you can tap to exit out of the suggestion prompt. Then, start circling the area or person you want to have amended, sort of scribbling around and inside the area to let the system know what to tackle. Note that you can use the two-finger pan gesture to zoom in and get a more accurate outline.
Magic Eraser Doesn’t Always Work

The Magic Eraser doesn’t always work! These things tend to happen. I tried removing the cutie running in front of mine, but the Magic Eraser only removed her head even though I selected her entire body. Sorry, kiddo.
(I blurred out the other kid’s face in Photoshop to protect their identity! But the white lines you see are all where I ran my finger with the Magic Eraser tool.)
Use Magic Eraser With Simple Scenes

In Alice in Wonderland, the Queen of Hearts is constantly yelling about offing their heads, so I figured I’d try to remove the head of one of her guards using the Magic Eraser. But all the leaf detail got in the way. It looks OK from far away, but it’s clear the computer struggled to complete the pattern up close.
Use Magic Eraser to Remove Objects

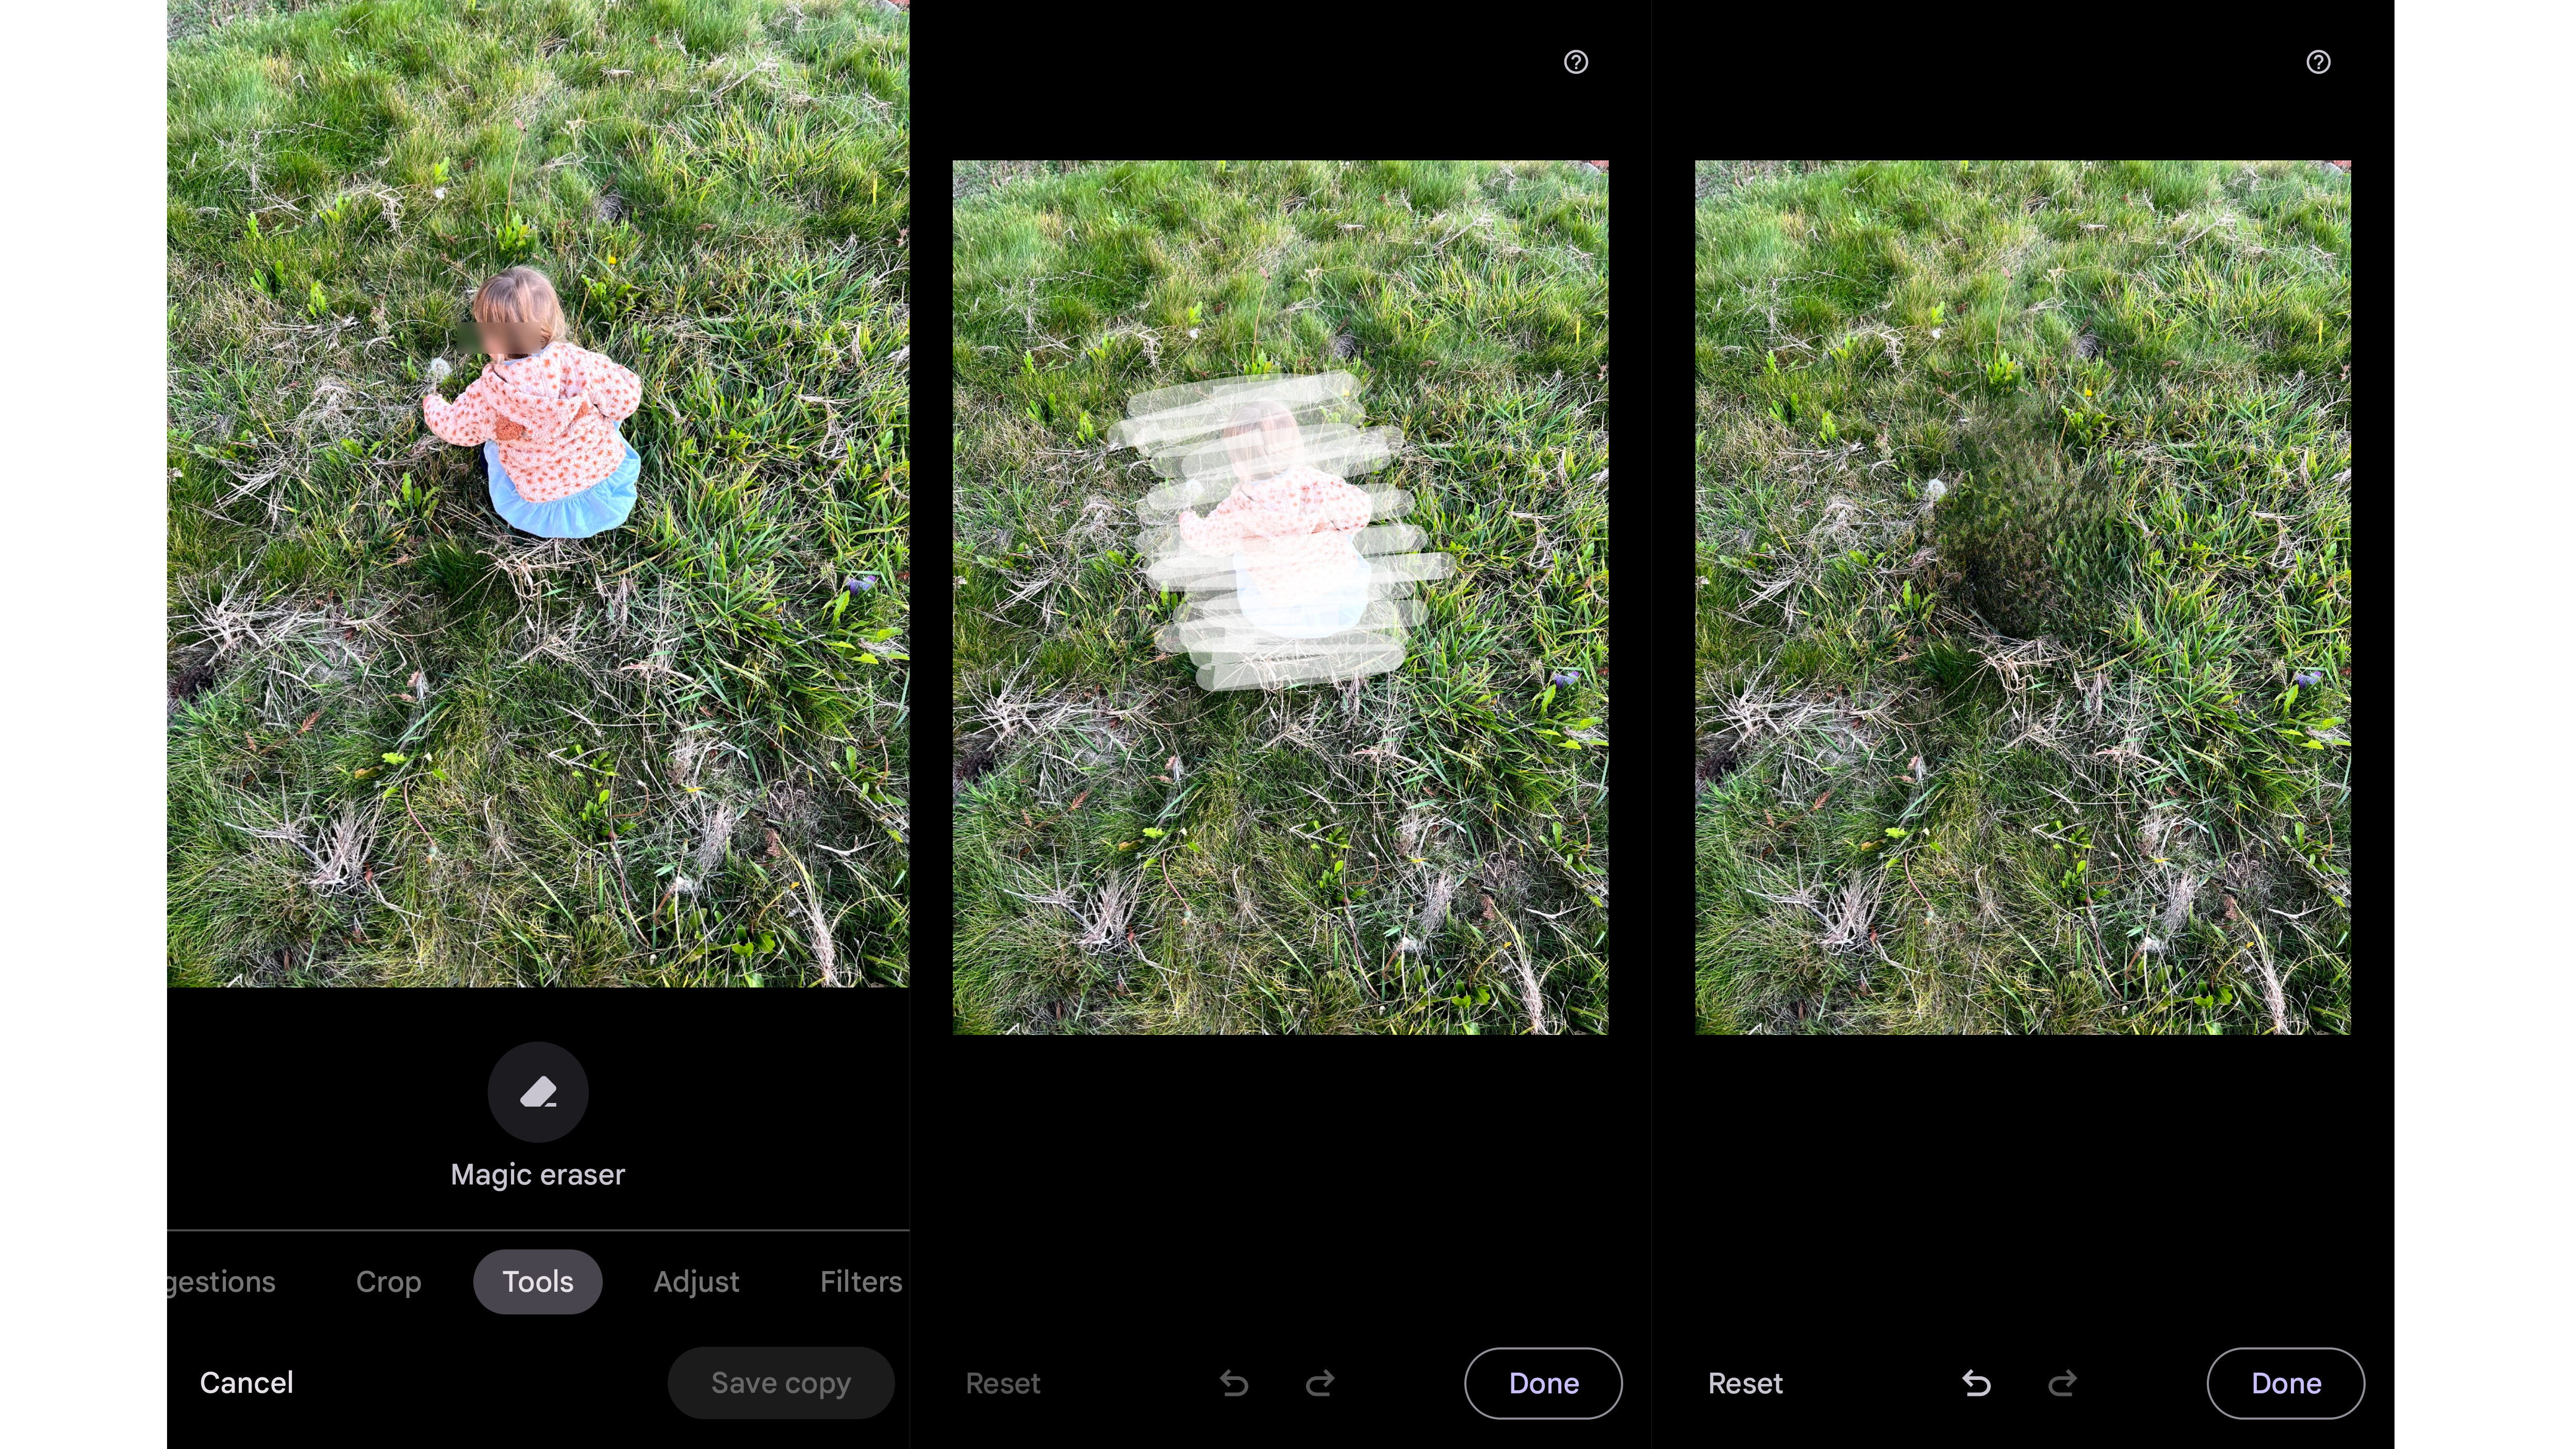
Needless to say, you don’t need to use the Magic Eraser to scrub a person. You can remove tiny details from a photo to make it look cleaner across the scene. I used the Magic Eraser to remove debris and stray leaves from a photo of my kid. I liked the way it cleaned up the general area. And because the green area is easy to replicate, Magic Eraser was able to integrate the edit.
You Can Use Magic Eraser on Non-Pixel Images
If you’re in a shared Google Photos album like I am, you’ll have to download pictures locally to your device before you can use the Magic Eraser feature.
I was curious to edit a photo of my kid that my cousin took with her iPhone 13 Pro Max. It didn’t offer the option while the picture was in the Photos album, even though I had it saved to my library. But once I downloaded the images to the Pixel 6 Pro, which I used for these shots, I could tap into Edit mode to remove my kid from a field of grass.
Of course, the end result was something else.