For me, it is now week three of self isolation. A bum immune system has kept me from leaving my house much, but luckily, I have an absurd array of inane solo hobbies to keep me occupied (plus, you know, writing these blogs), and I’m here to share one of my favourites with you all in these boring times.
This is a 12″ x 12″ piece of plywood populated with model railroading supplies and $12 worth of Hot Wheels/Matchbox cars that I had sitting around. This is the ultimate sweet spot hobby of dollars spent/time invested, in that it is cheap and will consume your entire life if you want it to. For anyone that’s ever built a model railroad (which is how I learned about this!), these techniques and materials used are all fairly familiar, but I will walk through an abbreviated step-by-step for those of you who are interested.
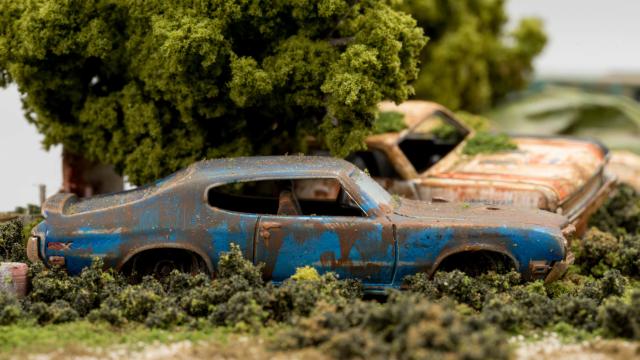
The first step is of course the cars. These are a bunch of Hot Wheels (and one Matchbox, the van) I had sitting in a plastic bag, waiting for me to make customs out of or do something with at all. They’re all mainline releases and so each sell for $2. To get the intensely weathered effect, I simply sanded each car down with a light sandpaper (a 1000 grit seems to be the sweet spot) to lightly wear on the cars’ paintjobs and give it a worn effect.
Next, I grab one of my weathering compounds to smatter the once-shiny paint of the toys with. I tend to lean towards Citadel paints (the stuff people use for Warhammer) because it’s really simple to get get that patchy rust look in one layer with a Technical, and then go over it with a light wash to help make it look more aged, but if you’d rather save some money, dry-brushing with oil paint will give a similar effect. No matter what paint I use, I try to make sure I always start my brushstrokes on a body line where I could imagine rust beginning, and then rapidly drag the brush down to cause intentionally visible brush strokes.
To help add visible ageing, it can be worth considering painting over any chrome plated plastic with an opaque acrylic, just to help reduce the amount of toy-car shine left in the display. I also will drill out the rivets sometimes to pop the whole car apart, to take the glass and wheels out like the Nova below. In the case of the GTO above, the interior was fully shiny chrome and I was simply feeling lazy, so I made that tarp covering out of printer paper, which I painted, crumpled, used a wash on, and then shaped to the car while damp.
Next is the grass and trees. These are actually much easier than a lot of people expect them to be! You can buy an entire shaker full of fake grass for about $US12 ($20) and it usually would be enough to accomplish a dozen of these projects. If you want an even more aggressively budgeted option, a lot of model railroaders will make fine-scale dirt out of real dirt.
The company that makes the fake grass, Woodland Scenics, also sells “tree armatures” and “clump foliage”. Essentially, the tree armatures are bare plastic wireframes, and the clump foliage can be glued to the frames to create the look of a fully-leaved tree. There are a variety of other techniques and “leaves” out there that can be used, but that was the setup that worked for me on this project.
The main tips I have for this process are as follows. First, ensure you have at least two different shades of ground cover (I used medium green/brown for a partially dead lawn look). Having a completely uniform grass colour looks extremely artificial when completed, and the varied colours will add a bit of texture to your diorama. Second, try and make sure that you don’t leave all the foliage on the trees itself – clumps of it make excellent bushes and scattered weeds!
I’ll bring out some of my old dioramas briefly to discuss roads and parking lots. Scale model roads can be done in a million different ways, and there are a lot of plaster-like solutions that have unrivalled realism and can be infinitely textured and worn down for a variety of different pavement types. However, they’re frequently expensive and take a bit of a while to cure, so I have found the cheap and lazy solution more than sufficient: both of the above dioramas use sheets of 3000 grit sandpaper glued to the base of the project. It can be sanded against itself to help wear out certain areas (think parking spots or intersections where cars would have driven through more frequently), the texture in photos shows up fairly realistically, and it’s still fine enough a grit to draw lines on.
For lines on the pavement, I end up using gel pens in a couple of colours and a straightedge to try and get them all straight and measured properly. The main thing to remember when drawing your pavement lines is to use the gel pen incredibly lightly. It takes hardly any force to get the gel to flow and you absolutely will sand the ballpoint flat if you push down too hard. For oil marks, burnout tracks, and the like, I use a regular ink brush pen.
The next part worth looking at is basic structures. For the shed in this project, I used stamped sheets of styrene plastic that I custom cut with a razorblade and glued together with superglue. The idea is simple enough, but styrene is actually rather hard to cut, so it may take a moment to get used to working with it. The company I ordered my sheets from sells a ton of different textures and styles for different scales and purposes, and most hobby shops will usually at least carry some variety so you can have a look in person at what you’ll be working with. It’s possible to make incredibly complex buildings out of styrene sheets with practice, but I am not that good yet – this shed was hard enough.
The last thing I’ll mention here that can add a ton of flair to any diorama is 3D printing. 3D printing is a form of additive manufacturing that looks basically like magic but is fairly cheap once the initial investment in the printer is over with, and shockingly easy to get started with printing. The vending machines, car turntable, and furniture in the diorama above were all made with a sub-$US250 ($415) Creality Ender Pro 3, with open source printing software and about 40 cents worth of plastic. I have the printer on a folding table in my living room – if you stick with PLA for your printer filament, there are no fumes created and it’s harmless to let it run while you go do other things.
There are a ton of free models available on sites like Thingiverse, so computer modelling skills are not even required to get some really useful pieces printed out. It’s not a necessity to build a cool diorama, but in some of mine, it’s become a really great way to help add a little extra pop to a small scene, especially for a car showroom like the one above.
Hopefully, this has helped give you some cool ideas about how to burn some time cost-effectively if you’re feeling a bit bored right now!