Being able to record your computer screen can be useful for all kinds of reasons—from streaming your gaming exploits to the world, to showing your parents how to turn on their antivirus software—and there are numerous ways of going about it. These are the top software and hardware options to consider.
Software recording
Both Windows and macOS have built-in screen recording tools now, though it’s most straightforward on a Mac. Hit Shift+Cmd+5 to bring up the screen capture toolbar, choose whether to record the entire screen or just a portion of it, then hit Record. The Stop button will be up on the menu bar. Screen recordings can be made through QuickTime as well (click File then New Screen Recording).
The Windows screen recorder is focused largely on gaming, though you can use it for anything you like. Find the Xbox Game Bar app on your Start menu, launch it, then click the Record button (the light grey circle inside a dark grey circle under Capture). Hit the Stop button to stop recordings, and Show all captures to see your videos—note that only the active window is recorded.
A plethora of third-party software options are also available, offering a variety of extra recording and editing features to tempt you into using them. Perhaps the best free option is OBS Studio for Windows or macOS, which is comprehensive and powerful if a little difficult to pick up for the complete beginner.
When you load up the interface, you’ll see you can add multiple video sources in the Sources box—a particular window or game, or the entire display, for instance. Next to that, you can set audio recording both from a connected mic and the audio produced by your computer. Fortunately, OBS Studio has some comprehensive help documentation to guide you step by step through the process.
In terms of paid choices, Camtasia (Windows and macOS) is a well-known choice for professionals who need a polished, feature-rich product and don’t mind paying for it—it’ll set you back $US250 ($370) as a one-off fee or $US50 ($74) a year for a subscription (which includes every annual update), though a free trial is available. You’d better be sure you need all of its features before you part with any cash.
Those features include the ability to drop in effects, music overlays, titles and annotations, and transitions, plus options for zooming and animating screen recordings, and support for interactive elements (like quizzes) in your recordings too. As well as recording your screen, you can record your webcam feed and other video sources too.
If you don’t want to spend quite as much, and don’t need quite as many features, TinyTake (Windows and macOS) is worthy of your consideration: It has a nice and simple interface for capturing windows or the entire screen, some useful annotation tools, and video sharing options built right in. Clips up to five minutes in length can be recorded for free; after that, you’ll need to sign up for a subscription, and they start at $US30 ($44) a year.
Those of you who are spending $US70 ($104) and upwards per year for Office 365 already have a screen recorder on your system—it’s built right into PowerPoint, though only in the Windows version at the moment. Open up the Insert tab and click Screen Recording to record part or all of the screen—this is primarily to drop into your presentations, but you can save the video to disk too, by right-clicking on it and choosing Save Media as….
Hardware recording
Sometimes software options just aren’t enough—maybe you need to record what’s on screen before your operating system properly starts up, or maybe you need to capture something that applications aren’t able to for whatever reason. For serious screen capture, you can invest in a dedicated hardware device.
As with the software, you’ve got quite a few options to pick from. The good news is that most of them are relatively affordable, if not quite at bargain basement prices—these capture cards are usually designed for gamers wanting to stream console footage to the web, but they’ll work on computers and other devices with HDMI out too.
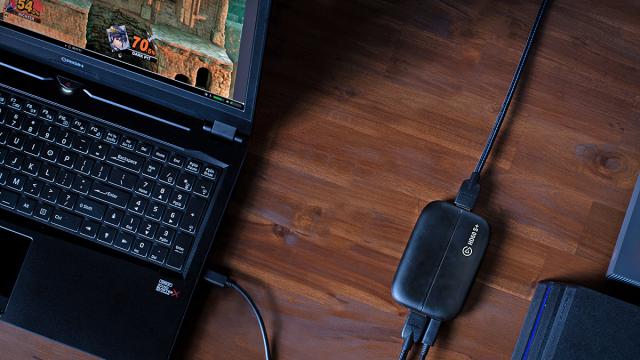
Elgato is perhaps the best-known name in the business, offering a variety of capture cards that work with Windows and macOS computers, as well as consoles. To give you an idea of how the process works, in the case of the $US200 ($296) HD60 S+, you connect it to the HDMI out on the computer you want to capture from, and to a spare USB port on the computer you want to use for the actual capturing.
You can use the same Windows or macOS computer to do both the displaying and the recording if you want, though obviously it’s easier if you use, say, a desktop and a laptop in tandem (especially if you’re recording resource-intensive programs). The machine you’re recording from will recognise the Elgato HD60 S+ as an external display, so you need to mirror or extend your desktop as needed (Display in Windows Settings or Displays in macOS System Preferences).
After that, you need Elgato’s own capture application, which is free to download and use. It combines both capture and editing, letting you tweak video recording settings, mix in audio outputs, add in a voice commentary (very useful for those gaming sessions), and stream the footage to the web as well as saving it to disk.
Other video capture software will work with the Elgato HD60 S+, including the OBS Studio suite we mentioned above. It’s usually best to stick with the software developed by the same company that made your capture card of choice to avoid compatibility problems, but a capture card box will typically produce a video stream that most applications are going to be able to recognise.
These capture cards can work with a variety of devices that have HDMI out—they just sit between the device and the attached monitor or television set (so you’ll need two HDMI cables rather than one, and a computer to do the capturing). If you need to record footage from a media streaming box, for example, that’s usually possible.
As we’ve said, while the Elgato HD60 S+ is the card we’ve used as an example here because we’ve actually got one to hand, others are available: including ones from AverMedia, Razer, and Hauppauge. Some cards are able to capture footage direct to a memory card, with no computer required, though you obviously lose the opportunity to preview and control your recordings in real time.
But these capture devices typically aren’t necessary if you’re just trying to help out a family member who happens to live far away. For that sort of task the built in screen recorders made by Apple and/or Microsoft may be all you need.