Despite being a 30-year-old image format in desperate need of replacement, the animated GIF still rules the internet. It’s useful for so many things; from visually illustrating a point, to delivering a devastating comeback. If you’ve ever wanted to make your own, with complete control over the quality and file size, here’s our guide to using Photoshop to turn videos clips into beautiful GIFs.
If you’re in a hurry, or simply don’t have access to Photoshop, there are many websites and standalone apps that can be used to churn out a quick and dirty GIF. But if you’re looking to create an animated masterpiece — something that will potentially be shared by your grandkids one day—Photoshop is the tool of choice. Its GIF editing abilities are robust, and its image processing tools will add an extra level of polish to your clips.
Sourcing your video
Finding a video clip to GIF, and getting it into Photoshop, is often the most time-consuming part of the process. You ideally want to start with the highest quality source material you can find because there’s always going to be a loss in quality when turning compressed, digitised footage into a GIF that’s further compressed — like making a photocopy of a photocopy. But more often than not you’ll be sourcing your footage from sites like YouTube and Vimeo, or social media, so take some time to find the best possible version that’s free of watermarks or overly aggressive compression artifacts.
Photoshop doesn’t support as many video file formats as a media player like VLC does, but it can import some of the more popular formats out there now like MP4, MOV, VOB, and even AVIs if you’re on Windows. Getting videos from popular sharing sites onto your desktop isn’t terribly complicated; there are lots of websites that can download video files from YouTube, Vimeo, Twitter, Facebook, and Instagram for you, but you’ll need to ask Google where to find them yourself.
An important thing to keep in mind when sourcing a video is to not get too carried away with resolution. A GIF made from a 4K video will certainly look great, but importing videos into Photoshop requires a lot of system resources because you’re essentially opening hundreds of photos all at the same time. It doesn’t take long to max out your computer’s RAM and scratch disks which can make your system start to feel slow and sluggish. As a rule of thumb, try to source videos that are slightly larger than the final GIF you’re making will be. For Gizmodo, GIFs used in stories are typically 800-pixels wide, so starting with source footage that’s no larger than 1,280 by 720 pixels in size (72oP) is ideal. This also gives you a little extra room to crop the footage if you want the GIF to focus on something specific.
Importing your footage into Photoshop
You’ll want to skip Photoshop’s standard ‘File & Open’ dialog and instead head to the File & Import & Video Frames to Layers option. Once you’ve selected a supported video file that’s sitting somewhere on your computer, Photoshop will open the Import Video To Layers dialog box which is where you can limit how much of a clip you want to import and work with.
On the right side of this dialog box you get a preview of your selected video clip with simple playback controls underneath it, as well as a current frame slider with adjustable in and out points that allow you to limit what section of the entire video Photoshop will actually import. Don’t get too caught up about being exact with the in and out points; it’s actually not a bad idea to grab a few extra seconds at the beginning and end of a selected clip and then trim the results later. You’ll also want to keep in mind that Photoshop limits you to importing 500 frames each time, so assembling longer GIFs will require multiple imports.
On the left side of the Import Video To Layers dialog you’ll want to leave Make Frame Animation always turned on, and you’ll want to use the Selected Range Only option under Range To Import instead of From Beginning To End. (This will also change automatically once you adjust the in and out points under the clip preview.) It’s also a good idea to change the Limit To Every # Frames option. Reducing the number of frames in a GIF animation can help keep its file size small, but to also keep the animation smooth you should set this to Limit To Every 2 Frames most of the time which simply tells Photoshop to only import every other frame from the video.
Increasing this number to three or more tends to make videos look choppy as a GIF plays, but there are cases when you might want to go much higher than two, such as importing slow-motion videos at …Every 10 Frames to speed up the footage. A higher number can also be used to accelerate a slow-moving timelapse, which results in a shorter and smaller GIF. Occasionally you’ll want to experiment with this number to get the results you’re after, or to keep a GIF small and easy to download, which could require repeated imports.
Adjusting the timing of your animation
If you have a 60-second clip and remove half the frames, the results will play back in just 30-seconds and any motion will appear to move twice as fast. So when using the Limit To Every 2 Frames option to import footage, you’ll have to tweak the timing of every frame of your GIF animation to compensate.
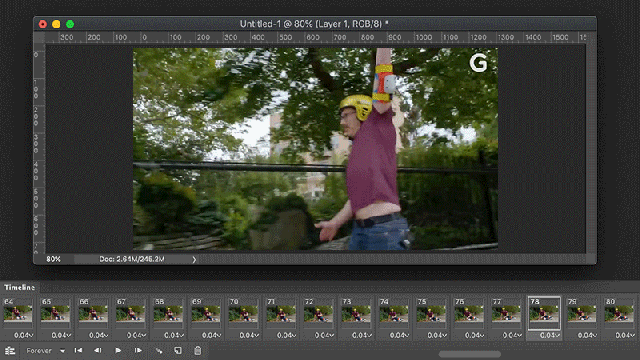
After importing your footage, Photoshop will automatically generate a layer stack of images and a timeline with every frame laid out horizontally as a series of thumbnails. Beneath each frame is a number which represents how long it will be held, in seconds, before the GIF plays back the next frame. In this example, each frame is being displayed for 0.04-seconds, but because only half the frames of the original clip were imported, this timing needs to be doubled so that the footage appears to play back at normal speed again.
Clicking on the timing indicator of each frame brings up a small menu allowing you to select from a series of presets, or enter a custom value using the Other… option. In this case, changing every frame’s timing to 0.08-seconds will make everything play properly. Had we instead imported …Every 3 Frames, we’d need to change this value to 0.12-seconds to compensate, and so forth.
To make your life easier, you can also use the Shift or Command/CTRL keys to select multiple frames on the timeline and change their timing all at once. These settings can also be used to change the speed of playback (for faking slow-motion or timelapse footage) or you can even hold a specific frame for a few seconds for added emphasis. Every frame of a GIF doesn’t have to play back at the same speed.
Editing your clips
Photoshop’s default Timeline view is nowhere near as robust as you’d find in a video editing application, but it provides enough functionality for turning videos into GIFs, including the ability to cut, paste, re-order, reverse, and even assemble frames from multiple projects into a single timeline — which is sometimes useful given Photoshop’s 500-frame import limit.
Frames can be re-arranged one at a time, or you can multi-select a series of them using Shift or Command/CTRL keys and move them all around at once. Deleting frames can be done the same way, allowing you to trim what you’ve imported to the most important parts.
In the upper corner on the right side of the Timeline window is a button that brings up a menu of very useful editing options. You can copy and paste frames between documents, and the Reverse Frames option is often a handy trick for making a GIF that appears to perfectly loop. There’s also a Tween… option that can be used to create a transition between two frames, but it essentially just creates a basic cross-dissolve instead of doing any kind of intelligent morphing between the two.
The ultimate goal when editing your footage is to make it as tight as possible to reduce the number of frames that go into the final GIF. But as a rule, try to keep individual clips in a longer sequence no shorter than 30 frames long. Any shorter than that and they’ll flash by too quickly in the final animation.
Making your animation shine
One of the many reasons Photoshop is an excellent tool for creating GIFs are its countless filters and image correction functions. However, since the software is primarily designed for editing one photo at a time, many of its tools are impractical for use on a 100+ frame animation. Tweaking the colours or adjusting the brightness one frame at a time is not only time-consuming, it will also result in subtle variations from each frame to the next that become more obvious when the entire animation is played back.
You’re better off using Photoshop’s Adjustment Layers, which are accessible using the half-filled circle button located at the bottom of the app’s Layers stack. Once added, each adjustment layer appears as an additional layer and they automatically apply their corrections to every layer sitting below them in the stack. Imagine placing a clear piece of red plastic (the adjustment layer) over a pile of photos on your desk (all the other layers), everything will appear red as a result. So to easily ensure that every frame of an animation is processed by an Adjustment Layer you’ve added, it’s best to move it to the very top of the Layers stack.
You can limit the effective area of an Adjustment Layer by adding a mask, or you can selectively turn it on or off on a frame-by-frame basis by stepping through your timeline (or multi-selecting a group of frames) and toggling the Adjustment Layer’s ‘eye’ which set its visibility. Photoshop will automatically remember every layer and adjustment layer that has been turned on or off for each frame on the Timeline.
Exporting your GIF while optimising file size and image quality
Once you’re happy with how your animation plays back, and after you’ve added any image enhancements like brightness adjustments or colour correction, you’re ready to make your GIF. The best way to do this in Photoshop is using the File > Export > Save for Web (Legacy)… option which opens a dialog box that can be a little intimidating at first, but you’ll eventually come to appreciate all the options.
Unless you don’t care about how large its file size ends up being, there’s no preset that will work for every single GIF. So the first thing you’ll want to do in the Save for Web window is make sure the 2-Up option is selected. This presents two side-by-side (or stacked) versions of your animation showing the original versus how it will look as a compressed GIF. You’ll have to do a bit of experimentation to balance file size and image quality for every GIF you make, but having this preview of the results can save you a lot of time.
1. Photoshop’s GIF 128 Dithered preset is always a good starting point when testing compression levels for your GIF, but you can easily configure and save your own presets here for quick access in the future. (A GIF Max Quality with the settings maximized for optimal image quality is also a useful preset to have here, but you’ll have to make it yourself.)
2. You’ll need to make sure this is set to GIF, but the Save for Web dialog also has extensive settings for customising the compression on JPG, PNG, and WBMP files (an antiquated black and white image format used on ancient monochrome mobile phones).
3. This is where you specify which Colour Reduction Algorithm Photoshop will use to convert your video into a GIF’s very limited colour palette. Adobe recommends setting this to Selective (the default) which tries to preserve as wide a range as colours as possible from your original footage. But after much trial and error, we’ve found we get much better results from the Adaptive setting which puts the priority on the most predominant colours in the footage. Stick with one of these two settings.
5. Unlike JPGs which can store more than 16 million shades, GIFs are limited to a maximum of just 256 colours. The more colours you choose, the better your results will look, but you’ll also end up with a larger GIF. This is one of two settings you’ll want to experiment with the most, but as a general rule of thumb, try to keep it above 128 colours. Your eyes will thank you.
6. Dithering is a technique that attempts to camouflage gradients that don’t look smoothly transitioned when limited to less than 256 colours. The example above is extreme, but left to right is a smooth gradient, that original gradient that’s been reduced to just eight colours with no dithering, and finally that eight colour gradient with 100 per cent dithering applied. The bands are still visible, but the overall image quality is much improved, despite the very limited colour palette. It’s best to keep this setting around 80 to 90 per cent, but keep in mind that pushing this all the way to 100 per cent will dramatically increase the file size of your GIF.
7. GIFs can have transparency, and although it’s not needed when converting videos to GIFs, leaving this on rarely affects the file size.
8. This setting pertains to colour management and colour profiles, but leaving it turned on will ensure your GIF looks as good as it can on older computer displays and monitors, with little to no effect on its file size.
The Save for Web dialog has a few other useful settings you’ll find in the bottom right corner. There’s a shortcut for reducing the Image Size of your GIF which can be useful if you’re trying to squeeze it under a certain file size or want to create a much smaller second copy that’s easier to share on social media. You can also change how many times the GIF will play in a loop, but Forever is the default and why would you not want your masterpiece to play endlessly?
No two GIFs are the same, so you’ll need to play around with the various Save For Web settings every time you make one. But once you’ve found a good balance between colours, dithering, image quality, and file size, you can save your GIF and start to share it with the world.
Is this the definitive, end-all way to turn a video into a GIF using Photoshop? Not at all. There’s more than one way to do anything in Photoshop, but through trial and error this is a workflow that we’ve found to be relatively quick and painless, and still resulting in excellent video to GIF conversions.