Apple’s venerable media suite isn’t everyone’s favourite bit of software, but there are more functions and features available here than you might have realised — from desktop shortcuts to hidden columns to Android support, we’ve picked out 10ten noteworthy tricks that you can make use of in the latest versions for Mac and Windows.
1. Use Up Next instead of playlists
Yes playlists are all well and good — and you can create some pretty inventive ones in iTunes — but at times you just want to queue up some tracks that you’re in the mood for right now. If that’s the case then the Up Next feature is a handy alternative to building a playlist.

Hover over a song and click the context menu button (three horizontal dots) — you can then choose Play Next to make the track the next one in the queue (pushing all the others back) or Add to Up Next to put it to the end of the existing Up Next queue. Click the queue button to the right of the playback window at the top to see upcoming songs.
2. Find the songs you really don’t like
Left unchecked, your iTunes library can become an unwieldy mess of tracks and albums that you don’t particularly care for. It’s worth spending some time rooting out the tunes that don’t mean that much to you any more — your random playlists will thank you in the future.
One straightforward way to do this is by bring up the songs you skip a lot. From the My Music screen, choose Songs from the drop-down list to the right, then right-click on the column headings and select Skips to show the column on screen. Click the new heading to see the tracks you’ve skipped the most.
3. Get creative with comments
You may well have completely overlooked the comments field in your library organisation duties but it can in fact be a really useful way of searching through your music, movies and TV shows. Want to identify all the instrumentals in your library? Or uplifting films for a bad mood? Leave a tag in the comments.
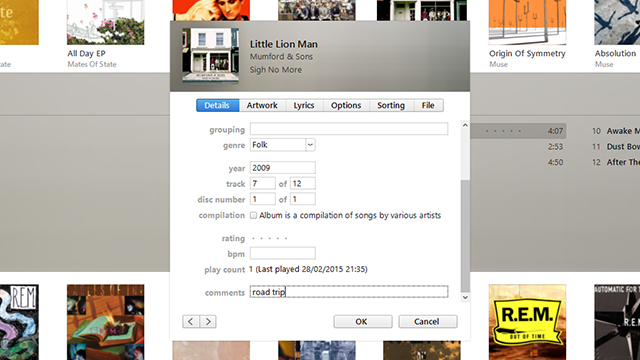
Think of them in the same way as labels in Gmail, a quick way of grouping together media files using criteria that iTunes doesn’t allow you to use normally. You could label movies you and your partner both love, or music suitable for a road trip, and so on.
4. Keep movies in view
If you’re trying to get some other tasks done while keeping half an eye on a movie or TV program, then you don’t want the likes of Photoshop, Office or Chrome getting in the way of your media content. Fortunately, iTunes lets you keep video playback on top of everything else.
Head to Preferences then the Advanced tab and check the Keep movie window on top of all other windows. Note that this will only work with videos that are running in a separate window from the main iTunes application (right-click on the playback window to set this).
5. Edit movie artwork
Most of us are well used to adding album artwork for music tracks but you can use the same trick for your imported movies and television shows too — by replacing the random thumbnails picked by iTunes you can get your video collection looking much better.
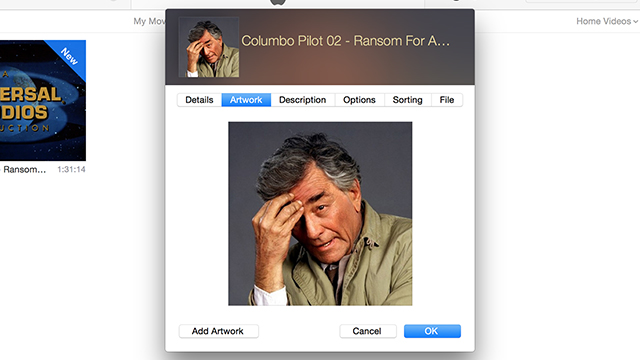
As usual, bring up the Get Info dialog and switch to the Artwork tab. You can load in the DVD or Blu-ray case cover, the official movie poster, or even your favourite frame from the film to represent the file in your iTunes library. This only works for your own imported videos though, not for official content bought from iTunes.
6. Copy tracks to Android devices
iTunes doesn’t work with Android, obviously, but you can copy and paste songs in a playlist as if you were using File Explorer or Finder. Plug your Android device in via USB, then get your playlist up in iTunes — use Ctrl+A to select all songs, Ctrl+C to copy them and Ctrl+V to paste them across to your Android smartphone or tablet (use Cmd instead of Ctrl on a Mac).
No matter where the files in the playlist are located, iTunes will physically copy the tracks across to the new destination. It’s not a perfect solution — your smart playlists won’t auto-update or anything like that — but it’s a quick fix for getting a playlist of files over to a non-Apple device.
7. Organise your apps
iPhones don’t rely on iTunes quite as much as they used to, but one of the reasons it’s still worth plugging in your mobile from time to time is because it lets you organise your apps a little more easily than you can when you’re tapping away at the screen on your actual mobile.
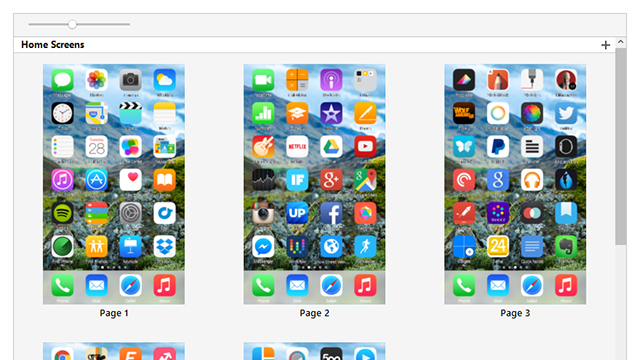
Under the Apps heading on the iPhone screen in iTunes you can add and remove apps as well as change their position on the home screens. It’s even possible to drag entire home screens into a different order. Double-click on the home screens if you want to reposition the individual app icons to your liking.
8. Hunt down duplicate items
Duplicate files can cause havoc with your carefully crafted playlists so don’t put up with them. Open up the View menu and choose Show Duplicate Items to see matches with the same song title and artist name. Hold down the Shift key (Windows) or Option key (Mac) while opening the View menu to access a more exact duplicates option based on album name as well.
Note that the search is only applied to the current playlist or view. If the metadata associated with your songs isn’t correctly filled out then bring up column headings like track length and file size and sort your library using these criteria to try and spot tracks that are the same.
9. Apply a tick to your favourite songs
Back in the day the small checkboxes next to songs in your iTunes library could be used to set which ones were transferred to your iPod/iPhone and which weren’t. Of course you can still use them in this way, but they can also help you include or exclude songs from your playlists.
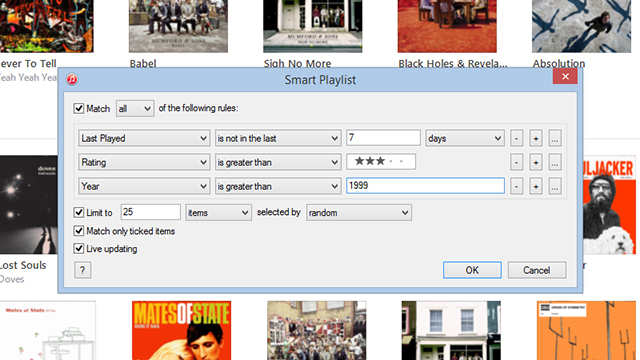
Every smart playlist has a Match only checked items box so you can miss out any unticked items. You could just place ticks next to your most favourite tracks, for example, or untick Christmas songs that you don’t want to hear outside of the holiday season.
10. Control iTunes with your iPhone
Kick back on the sofa or snooze in bed and control iTunes playing on your PC or Mac with the help of the Remote app for iOS. As long as you’re on the same Wi-Fi network, a simple PIN code is all that’s required to link your mobile device with iTunes for Windows or OS X.
There are plenty of third-party alternatives to pick from too. TodayRemote works with multiple Macs and lets you control iTunes from the Notification Center (Spotify and Rdio control can be added via an in-app purchase), while BTT Remote is also worth a look and gives you full remote control over your Mac machine.