Everybody’s MacBook breaks. At some point or another, the hard drive will shudder to a stop; the display hinge won’t hold up any more; the logic board will cease to function. It’s only a matter of time. Fortunately, you can fix most of it yourself. Here’s how.
Despite the prices at the Apple Store, MacBooks are remarkably durable and pretty cost-effective to fix. That is, if you know what you’re doing. Apple banks on the vast majority of its users lacking computer technician skills, or at least the Genius Bar implies that you need to be much more experienced than you actually do to fix some simple things on the old MacBook Pro. But websites like iFixit offer amazingly helpful guides to fix almost everything in your machine.
There’s a short list of things that typically need to be repaired or replaced, and you can probably do the work yourself. Your battery will fail. Your hard drive will sputter and die. Your RAM will buckle under the heavy workload of new software. Save yourself a trip to Apple Store and several hundred dollars with the help of this handy guide. We’re using a mid-2009 MacBook Pro for our model, but the work on the other models is essentially the same (except when it isn’t, and we’ve made note of that below).
We’ve also included links out to more detailed guides for all the models, and you should go straight to iFixit if you have a Retina model as they’re built very differently. They’re also more difficult to repair. And it almost goes without saying that MacBook Airs are a different animal — the RAM is soldered on, for one thing — though they can also be repaired. If you’re one of the millions of people with a regular ol’ MacBook Pro, though, this is the guide for you.
The Basics
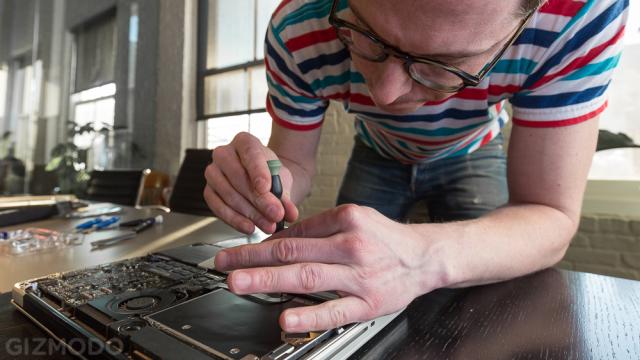
It seems very scary to start unscrewing the screws and pulling apart your MacBook, but trust us, it’s perfectly safe. You just need to remember a couple of key things: don’t spill anything inside and don’t lose any of the screws. The spillage thing is obvious, but keep it in mind before you put a cup of coffee on your workstation. The screw thing, again, is obvious, but these things are tiny. It’s not that hard for one to roll off the table, onto the carpet and out of your life. Also, be sure you’re using a Phillips #00 screwdriver to avoid the unspeakable frustration of trying to fit the wrong tool into the right screw.
[clear] All MacBook repairs start at the same place: the bottom part of the case. Be sure your workspace is clear, and flip the machine over so that you’re staring at the bottom. Around the edge you’ll find 10 screws: seven tiny 3mm-long screws (that are so easy to lose) and three 13.5mm-long screws. Unscrew and remove all of them. Lift back the front side of the case back, and then pull up on the back. You’re in.
[clear]
Battery
Apple really threw everyone for a loop when it came out with the unibody MacBook Pro that hid the battery inside that ridiculously pretty aluminium case. Of all the parts on the machine, the battery is undeniably one with a lifespan, so now it’s a big pain when it comes time to replace the thing. Now, instead of flicking a release switch and snapping a new battery in like in the old days, you’ll have to do a little surgery. But only a little.
First, buy a new battery here. Check and double check that the battery you buy is compatible with your machine, as they’re all a little bit different. Once you’ve got the back off of the machine, you can’t miss the battery. It’s the big black thing taking up nearly a quarter of all the space. To pull out the old one takes two steps:
1. Unscrew the two screws on the inside edge of the battery. You’ll need a special tri-wing Y1 screwdriver, and you can buy it here. (Note: The 17″ and some 15″ models have three screws instead of two. Check out the slight differences here and here, respectively.)
2. Use your fingernail or a piece of plastic to unplug the battery from the logic board. Be careful not to disturb the two chips to the right of the plug! (Note: The plug for some of the 15″ models is on the side of the logic board instead of on top, but unplugging it is pretty self explanatory.)
[clear] The third and fourth steps of the procedure are obvious. Plug the new battery in and secure it to the machine with the two screws you pulled out (and hopefully didn’t lose.) That’s it! You can find more pictures and more detailed instructions at iFixit.
RAM
Chances are you’ll eventually notice your computer slowing down and it will annoy the hell out of you. This is perfectly natural. As software gets better and you get busier, you start hogging the computer’s RAM more and more. Luckily, it’s an insanely easy and satisfying upgrade to get back up to speed. That is, assuming you didn’t max out the RAM on your machine when you bought it, in which case, you’ll need to buy a new computer.
Believe it or not, swapping out the RAM in your machine doesn’t take any tools, after you’ve removed the case from the back. The RAM slots are located just above the black battery and the sticks themselves are just a little bit shorter and fatter than a stick of gum. Again, two steps to success:
1. Remove the old RAM. If both slots are full, you’ll need to take out the old RAM in order to install the new one. Just find the plastic tabs holding the top stick in on each side and pull those back. Now pull back on the RAM stick so that it just comes out of the slot, and lift up on the back to pull it out of the bay. The stick below it will be a little harder to get to, but the process is the same.
[clear] 2. Install the new RAM. Just do the reverse of what you just did. Push the exposed end into the slot, and push it down until it snaps into place. Go to iFixit for more pictures and details.
[clear]
Hard Drive
This one sounds like it would be hard, but it’s frightfully easy. Like the battery, a MacBook’s hard drive has a limited lifespan. (That’s what it gets for having moving parts.) And like the battery, it’s a two-screw procedure. Before you start pulling anything apart, you’ll definitely need to invest in a new hard drive. Try here. If you’re being charged more than $US100 and it’s not massive or a solid state drive, you’re probably getting ripped off. It’s also not a bad idea to consider upgrading to an SSD or hybrid drive. The difference in performance can be life-changing.
Keeping things consistent, removing your MacBook’s hard drive can be done in two easy steps. This is, of course, after you’ve backed up the old hard drive so that you can move the data onto your new one:
1. Unscrew the two screws between the hard drive and the optical drive. The hard drive sits in the bottom corner of the machine to the left of the battery and just below the optical drive. It typically has a white sticker and the letters GB on it somewhere. Unscrew the two screws holding it in place and remove them, pulling the black bar immediately beneath them out too. (Note: Some 15″ models require you to remove the battery first. If you have one, check out the details at iFixit.)
[clear] 2. Unplug the hard drive. The hard drive will be connected to computer with a flat ribbon that has a large plug on the end. Gently pull that out of the hard drive and you’re home free.
Once again, to install the new hard drive, you just need to reverse the steps. Plug the ribbon into the new drive. Place it into the empty space, and return the black separator bar to its place. The two screws will secure it. Check out more pictures at iFixit.
One more thing: Unlike the RAM and Battery replacements, the hard drive job requires some extra steps once you turn the machine back on. It basically amounts to reinstalling the system software and then recoving the data from your back up. Read the step-by-step instructions at iFixit.
[clear]
Tougher Repairs
It’s obviously technically possible to repair a lot more on your MacBook, but more than two steps will be required for all of them. We don’t recommend trying these out unless you’re prepared to spend a decent amount of time doing laptop surgery, and you should be prepared to screw up a couple of times. In no particular order, some of the worthwhile but difficult repairs include:
1. Tightening the display hinge. You know how after a couple of years, your MacBook display gets a little, err, droopy? That’s because a little part inside of the top case gets out of whack. It’s easy enough to get back into whack, but you basically have to take apart the whole display to do it. This is how.
2. Fixing a broken keyboard. Did you spill pink lemonade on your keyboard and short some stuff out? That was dumb. You’ve probably lost the use of a few keys, and you definitely want them back. Unfortunately, you can’t just replace the keyboard on the new unibody MacBook Pros. You have to replace the entire top case. It’ll cost you about $US250, and you can find an installation guide here.
3. Replace a broken logic board. This is the mother of all MacBook repairs not because it’s the most difficult — it almost is — but because it will save you the most money. If you go to the Apple Store and let them replace the logic board, you might as well buy a new machine. If you buy a logic board on eBay and replace it yourself, you might as well kiss your weekend goodbye. You’ll want this guide to show you the way.