This article will save your life. A basic paper map is the simplest, most reliable and most effective way to find your location and navigate somewhere else. But, in the age of GPS and Google Maps, many people have forgotten how to use one. Here’s how to never get lost again.
But I’ve Got A Smartphone/GPS Navigator/General Gadgetry! You do right now, sure. But will you tomorrow, without a battery charge? What after you crash your car, dirt bike or plane or fall into a river? What about after you just drop it from hand-height onto a rock? What if there’s a software glitch and you lose your map data and you’re out of cell coverage? You know how fragile and finicky your gadgets are so you should also know that you should never rely on one when navigation could be the difference between life and death. Or even just an easy day and one spent being miserable, lost in the woods during a storm.
Paper maps don’t break when you drop them. Most are printed on waterproof or resistant paper, so they will survive getting wet. A piece of paper can’t run out of battery. And, to top all that off, paper maps are incredibly cheap or, if you’re willing to put in a few minutes’ work, even free.
With a moving part in it, a compass adds a slight degree of that-might-break-iness. But it will still be far more rugged than a battery-powered gadget and, often, far more accurate too.
The two combined are something no person doing anything in the outdoors or even just travelling through a remote area should ever be without. Of course, they’re not much good if you don’t know how to use them. But the good news is that knowledge will survive a fall.
Types Of Maps: Before heading out to hike the Lost Coast over Christmas, I was pretty busy with work and life so didn’t pay much attention and just ordered the first map that came up on Amazon, then didn’t really look at it until we’d driven all the way up there. It was worse than useless, lacking any topography data or even a to-scale representation of the trails. And some of the trails on the map didn’t exist in real life. Don’t make that same mistake.
Any map is going to be a basic, two-dimensional, top-down representation of a real-world, three-dimensional area. It’s the data on it and how that’s displayed that separates them.
Where a basic trail or road map will just have lines indicating the position of trails or roads — often with an oversimplified representation of their shapes and scale — think the New York Subway map — a topographic map will give you a detailed and accurate representation of the three-dimensional shapes of the terrain around you.
This is the most effective type of map and the one you should seek out. On a topo map, contour lines do what they sound like and trace the contours of the landscapes features. Each line will be a constant height apart (depending on the scale), giving you an idea of the height of, say, a mountain, its shape and the steepness of its individual sections.
The simplest way of using a map to figure out where you are is simply to look at these contour lines to create a 3D image in your head, then compare that to what you see. “That cliff face over there is here on the map, so I must be standing… right here, between it and the river.” That probably sounds complicated, but we’ll go into detail and with a little bit of practice you’ll have it down in no time.
But first, we should probably go over some terminology.
A Brief Map Glossary
Latitude: Latitude lines go east/west and measure how far north or south you are from the equator. “Ladder” and “Latitude” kinda sound the same, and the rungs on a ladder are like latitude lines, so that’s how I remember which one it is.
Longitude: Longitude lines run north/south and measure how far east or west you are of Greenwich, England.
A map’s position is defined by the position of its southeast (bottom right) corner and is oriented so north is up and south is down.
Scale: How zoomed in you are. You can find a map’s scale in its margin or legend. The scale is listed as “1:XXXXX,” meaning that one unit of measure on the map represents “XXXXX” times that number in the real world. Most USGS topo maps, which is the standard we’ll using for most examples in this article are: 1:24,0000. So, one inch on one of these maps represents 24,000 inches in the real world. Or a little over 1/3 a mile.
Legend: Explains what the various symbols and colours on the map mean.
Map Name: The colloquial name for the region a map covers. “Yosemite National Park,” for instance. Always check a map or maps covers your entire route; it’s easy to be off one edge even if a map is titled for the loose area you’ll be travelling through.
Year of Production: The year in which the data for the map you’re looking at was collated. If there’s a single date on the map, this is it.
Year of Revision: The date on which the map may have been updated to reflect changing conditions. If there’s a second date on the map, this is it.
Photo Revised: When or if the map was last checked against the real world.
Distance Scale: A to-scale representation of a standard distance, typically a mile or kilometre or both. Helps you work out distances between points.
Contour Lines: On coloured maps, these are typically brown lines that trace the contours of geographic features, by elevation. They’re spaced a set distance apart.
Contour Interval: Important! The elevation between contour lines. You can then count the lines to see how much elevation you might need to gain or lose on a given route or to determine the relative height of geographical features around you.
Magnetic Declination: The difference in angle between magnetic north (where your compass points) and the place where Santa Claus lives.
Creating A Mental Image From A Map: Ok, with all that in your head, how do you translate a two-dimensional image into a mental image of the terrain you’re looking at?
First, let’s make sure we all understand those pesky contour lines. Look at the room around you and its furniture, now imagine it filled with one foot of water. “Draw” an imaginary line at that one-foot water level, then add another foot and “draw” a line there; so on and so forth. That’s what contour lines are doing in the real world, displaying an absolute height apart.
The closer the lines are together in this top-down view, the steeper the terrain. The further apart they are, the more gradually sloped. The idea is to paint a picture of what geographic features like mountains and hills and valley and peaks and whatnot look like.
Let’s look at some typical features you’ll find out in the world and see how they’re represented by contours:
(1) Steep Slopes: The closer contour lines are together, the steeper the slope is.
(2) Gentle Slopes: The further apart the lines are, the more gradual the slope.
(3) Valleys: The contour lines form a “V” with the point facing uphill. This is naturally how water runs off the terrain.
(4) Ridges: The contour lines form a “V,” this time pointing downhill.
(5) Peaks: Contour lines forming circles.
Ok, the positions on these images don’t quite line up — I’m on a plane headed to Iceland — but hopefully you get the idea. Circles are peaks, when the lines go close together then the terrain is steeper; when the lines spread out, it gets less steep. Ridges are Vs that point down, Vs that point up are valleys.
How To Measure Distance: Grab a little piece of string and trace your intended route on the map. Now, pull it straight and compare it to the map’s Distance Scale. Easy, right?
You’ll frequently find interval distances listed for hiking trails. A little number tells you the distance between two points on the trail. I’m not sure who calculates these, but assume it varies between maps created by different entities and have encountered some significant differences between these distance and those in the real world. Last summer, I was looking at a map of the Sespe Wilderness — an area I know very well — and noticed something was very off. A hike that was shown to be only 5.7 miles long on the map was actually more like 12 to 14 in real life. I’d hiked it before. The moral of this story is to measure distances yourself, or at least apply some critical thought to them.
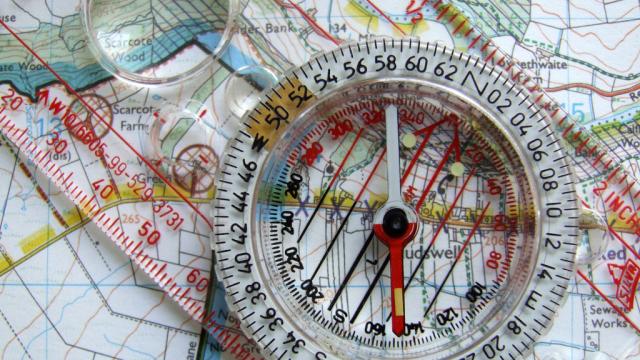
How Compasses Work: First, buy a compass that looks like this one (above), complete with a rotating degree dial and a transparent base plate. You can use any compass in a pinch, but one of these is best and will make your life a lot easier. Here’s all the compass you’ll ever need for $US15.
Your map is oriented true north, but your compass points at magnetic north. Fun! And, this can lead to some fairly big navigation errors. Goof just five degrees on your intended direction and you’ll be nearly a mile off after just 10 miles of hiking.
That’s why there’s a Magnetic Declination key.
There’s a couple different things you can do with your compass, but to just get an idea of what’s in which direction, just stick your compass on the magnetic declination key and turn the map a little so it’s oriented towards magnetic north.
Alternatively, you can adjust a quality compass for the declination in your area of travel. They all differ a little, but should include instructions on doing so.
How To Take A Compass Bearing: So you’ve got a destination or waypoint picked out either on the map or in real life. Now you want to be able to head towards it, regardless of vision (imagine a thick fog or nighttime or dense woodland or whatever).
Using one of the nice compasses describe above, you’ll be able to navigate in a specific direction, rather than simply going loosely north east or similar.
Look at the bezel ring surrounding the needle. On it, a 360-degree circle is broken down into two or five-degree increments. These measure the distance towards a point in relation to its clockwise angle from magnetic north. Take particular care to set a bearing precisely and you’ll avoid spending time and effort by being tracked off-course over distance.
If you’re headed towards, say, a peak you can see in the distance, simply hold the compass flat, with the direction of travel arrow pointed towards said destination and twist the bezel so the big red arrow inside it aligns with magnetic north. Take note of where your intended direction of travel lies — say 40 degrees — and consult the compass regularly to ensure that you’re walking in that direction. So long as the big red arrow inside the bezel lines up with the compass needle when the compass is pointed ahead, you’re headed in the right direction.
Taking a bearing from a map is basically the same idea. Align the map with magnetic north. Look a the map and figure out where you are and where you want to be. Sit the compass on the map so the direction of travel arrow or long edge lies along the imaginary line between your location and destination (or way point). Twist the bezel so the big red arrow inside it aligns with the needle. Note the degree of your bearing. Now, pick up the compass and hold it level. Keep the needle in the big red arrow and you’re headed in the right direction.
How To Use A Map And Compass To Determine Your Exact Position: If you’re ever really lost and need to reestablish confidence with either yourself or a group, do this. Knowing exactly where you are on a map is a huge confidence booster and is equivalent to pushing the reset button on any previously erroneous navigation. Don’t worry though, your dog always thinks you know exactly what you’re doing.
This is just like using GPS, it shows you exactly where you are.
First, find two prominent visual objects you can identify on your map, the further apart the better. The peaks of big mountains or similar, can’t-mistake-them features work best. Hold your compass level and point its direction of travel arrow directly at the first object. Twist the bezel so the big red arrow inside it aligns with the needle. Locate that object on the map and place a long edge of your compass on it. Keeping that edge on top of the object, rotate the map until its orienting lines align with the orienting lines inside the compass bezel. Trace the line created by the edge of your compass on the map, you are somewhere on it. Repeat the process with the second object. Where the two lines cross, that’s you’re exact position. Congratulations, you’re no longer lost.
Where To Find And Build Maps: A map gives you knowledge and knowledge gives you the ability to make informed decisions, to change plans, to respond to unexpected circumstances or to figure out where the hell you are if you get lost. So, you want a map with the most data possible.
In the US, the gold standard for topo maps is those created by the US Geological Survey, or USGS. The best hiking or backpacking maps then transpose trail data onto those maps. In Caliifornia, Tom Harrison does a great job of doing just that for popular areas. There’s many other sources of similar maps; I typically just search “[Area Name], Trail Map,” then browse through the options for something that’s built with USGS
But, you may have unique needs, in which case you should create your own map. This allows you to print a chosen route on top of the best topo map for a given region in a scale that best suits your individual situation. We’ve got a detailed article on doing that for free right here. It’s not just for Android phones, there’s substantial guidance for everyone creating any map.
If you go that route, try to get yourself an end result that encompasses the total area in which you’ll be travelling and which gives you the most possible data on trail locations, water sources and the like. Carrying one, large scale map that encompasses your total area of operation, plus smaller scale maps that cover your individual needs is the best idea. You can buy waterproof printer paper, put the maps you create in plastic baggies, laminate them etc. It’s worth putting in the effort; a damaged map is a worthless map.
Navigating The Real World: Use that mental image of the terrain around you to keep constant tabs on your position. Build a picture of the area you’ll be passing through and make sure things feel right as you do. Periodically, stop and check your position; how often you do this will be a a factor of the kind of terrain and weather conditions you’re dealing with.
Make a brief navigational plan in your head: You’ll cross the river where it bends left and the big cliff should be on your right; stuff like that. Choose destinations and way points in relation to unmistakable terrain fixtures, then pay attention to your relative location to those features.
Most of the time, if you’re simply following marked trails. Easy. But, knowing this stuff will help you fill in the gaps, fix a problem or just be confident you’re headed the right way.
There’s more advanced and complicated things you can do with maps and compasses; we’ll cover those in a future article. The information here should be all most people need for basic navigation and general preparedness. Go out and spend some time working on these skills, it shouldn’t take long to master them. Then, carry a map and compass with you anytime you travel and you’ll never get lost. Seriously, it really is this easy.