We’ve known about iTunes Match for a while, but it just went live today in the US. The $US25/year music service promises to not only store your iTunes purchases in the cloud, but to back up your non-iTunes tracks as well. So how does it work exactly?
Giz AU editor’s note: For more on why iTunes Match isn’t available in Australia, Lifehacker Australia has all the details.
The first thing you need to do is download and install iTunes 10.5.1, which you can find here. If you need further explanation on how to install iTunes, give up now. As for the rest, well, walk with me.
Once you have iTunes installed, click the sidebar option on the left that says iTunes Match (it’s under the Store subheader). There will be a button down on the lower right side which will begin the process. You may need to verify your credit card, and then the show will start.
Oh, and one major caveat: there’s a hard limit of 25,000 non-iTunes tracks, so if you’ve got a mega-library of stuff you didn’t buy from Apple directly, Match may not be worth the investment.
iTunes will take some time chewing through your library and analysing it. Then you’ll have to wait a little longer as Apple matches tracks between your computer and its servers. Depending on how big your library is, this could take anywhere from 30 minutes to hours and hours and hours. It took Match about an hour to sync up with my 3000 song iTunes library.
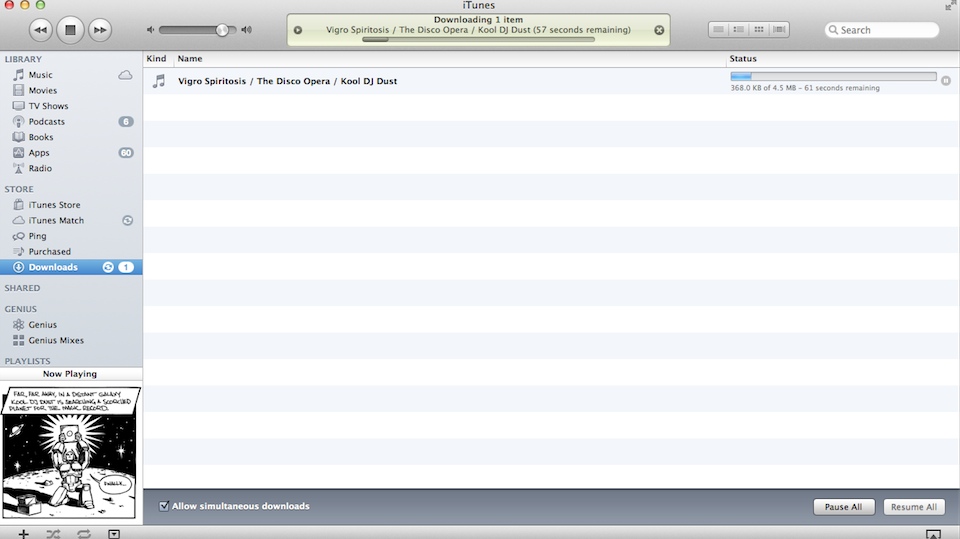
iTunes will then begin the process of uploading any files that couldn’t be matched by iTunes to your iCloud account. Depending on how much iCloud space you have and whether or not you want these tracks mucking up your iCloud, this could take longer than any other part of the process. The good news: you’ll have access to your previously matched songs during this upload, so you can kill time playing with those. Here’s how!
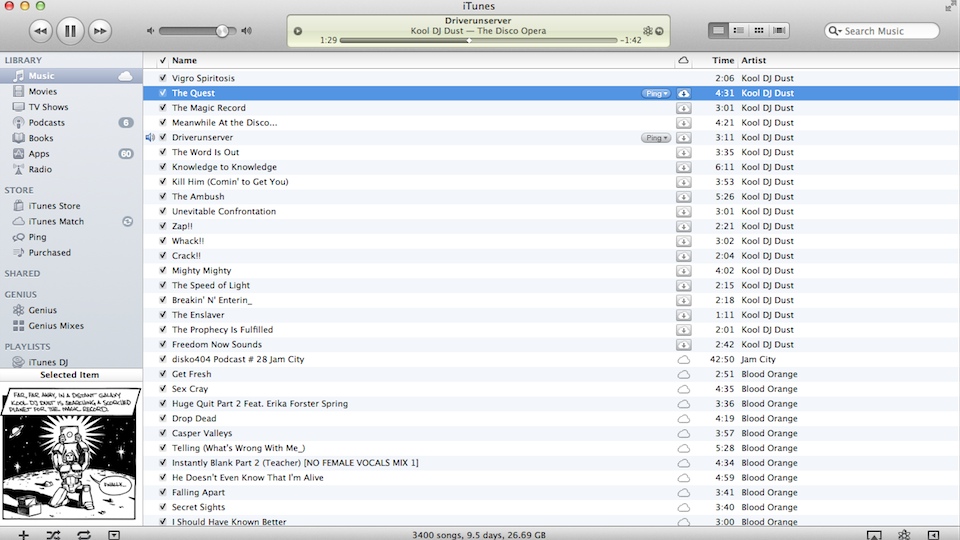
In iTunes, you won’t notice much of a difference right off the bat, because the majority of the tracks are already in your library and on your computer. But you may notice stray iTunes purchases from past devices that you’ve lost track of camping out in your playlists all of a sudden, which is a nice little reunion.
Otherwise, if you see a cloud graphic next to a song, that means it’s on the iCloud servers waiting to be snatched by you. If you see an outline of a cloud, that means it’s a track on your computer that hasn’t been matched, and either wasn’t/couldn’t/hasn’t yet been uploaded. If there’s no icon, that means the song is on your computer locally, as well as in the cloud.
Double-clicking a track that’s in the cloud but not on your computer will stream the track for you, but not download it.
Clicking a song’s cloud graphic, however, will send it to the download queue in iTunes, adding it to your local library. Library matching doesn’t appear to be automatic, so you will have to run the iTunes Match library scan on a periodic basis (depending on how often you purchase music).
So that’s iTunes; here’s iOS. To activate iTunes Match on your iOS device, go into Settings > Music and toggle on iTunes Match. BE WARNED: TURNING THIS ON WILL WIPE OUT THE MUSIC FILES ALREADY ON YOUR DEVICE. There. You’ve been warned.
When iTunes Match is activated, the Music app will display all the songs that are available to you in the cloud, regardless of whether or not they’re stored locally on your device. If you don’t want this turned on for whatever reason, you can toggle it off and it will only show the tracks stored on your device.
Now when you open your Music app, you’ll see all of your matched tracks before your very eyes, complete with the same cloud icon system as in iTunes: a full cloud means a song is ready to be downloaded, no cloud means a song’s not available for remote download. Tracks you download OTA will also not display a cloud graphic, so there’s no delineation between locally stored tracks and unavailable tracks. Which can be a little confusing!
When you select a track that’s in the cloud, it will begin playing while it downloads. You can also download tracks without listening to them by tapping the grey cloud icon next to any song. The best way to download tracks en masse is to a playlist, so that you can download them bunches at a time.
If you want to delete a track that’s locally stored on your device, just swipe to the right over the track and it will bring up the delete button. Problem solved.
Aaaaaaaaaaaaaaand that’s about all you need to know when it comes to using iTunes Match. Enjoy!