When you’re browsing from a public Wi-Fi connection — like at your favourite coffee shop — anyone on that network can snoop on what you’re doing, with very few exceptions. So can the IT crew at your workplace. Today, we’re going to walk through setting up an encrypted proxy server on your home computer so you can secure your browsing session no matter where you’re connected, keeping your private data significantly more private.
What’s the Point?
We’ve mentioned this more than a few times, but when you’re browsing on a public Wi-Fi network and aren’t connecting to sites that use HTTPS, anyone on that network can see what you’re doing; they can grab passwords sent in plain text, or they can potentially steal your browser cookies and pretend they’re you. (That’s how, for example, Firesheep works.)
Earlier this week, we offered some tips for securing your online life the easy way, which involved using HTTPS connections on websites that provide them, stashing your passwords more securely, and keeping your plugins up to date (among other things). Today we’re going to take this to a big more advanced level, detailing how to encrypt and secure your entire browsing session, regardless of whether or not your using HTTPS to browse a site.
Here’s How It Works
Below, I’m going to detail how to set up a secure, encrypted connection to a web proxy you’re going to run from your home computer. The secure proxy will hide all your browsing from prying eyes, even on a public network. Prox-wha? A web proxy is essentially a middleman that stands between you and the web at large. When you browse to a page using a proxy, you pass your request to the proxy, which actually fetches the page content and then passes it back to you.
A proxy alone isn’t enough if you’re connecting via a simple, unencrypted HTTP connection — a sneaky user could still watch what you’re passing back and forth over a public network. The special sauce involves Hamachi, a free app that creates a secure, encrypted Virtual Private Network (VPN) between your computer and any other of your computers that you’ve installed and configured Hamachi on. By setting up a proxy on one computer, then connecting to that proxy using a secure connection via Hamachi, you’re able to encrypt and secure your browsing session.
If that sounds complicated, don’t worry: It’s actually pretty easy to set up, and I’ll walk you through every step. Hat tip to user warwagon from the Neowin forums.
What You’ll Need
- An always-on computer: This is the computer you’re going to securely tunnel your traffic through when you’re browsing from outside your home network.
- Hamachi: A free (for non-commercial use), cross-platform VPN service that, simply put, gives you secure access to your home network no matter where you are.
- Privoxy: A free, easy to set up web proxy with advanced privacy features.
Step One: Install and Set Up Hamachi
The first thing you’ll want to do is install Hamachi on the computer that’s going to act as you proxy and on the computer(s) you want to browse securely on when you’re on a public network. For example, I’ve got Hamachi installed on my Windows desktop computer at home (which will act as my secure proxy), then also installed on my MacBook Air (which I’ll be using on public networks).
Once you’ve installed and powered on Hamachi (the first time you launch it, you need to click to blue power button to “Power on”), you’ll need to create a new private network. To do so, click the Network menu, then select Create a new network. Give your network a unique ID and password (remember the password), then click Create. That’s all there is to setting up your new network.[imgclear]
Next, download and install Hamachi on your laptop or other machine. Again, power on Hamachi, but this time, instead of creating a new network, select Network > Join an existing network, and then enter the Network ID and password you set up on the first machine.[imgclear]
You can rinse and repeat this on every machine you want to do this with, for up to 16 clients (that’s the limit for Hamachi’s free-for-non-commercial-use version). Now that you’re set up with Hamachi, it’s time to install Privoxy on your always-on home machine.
Step 2: Install and Set Up Privoxy
Privoxy is a free, open source web proxy that we’re going to install to your always-on home machine. So download Privoxy from Sourceforge for your system and install. Privoxy is available for Windows, Mac and Linux, so you should be able to find a download to fit your needs. For my example, I’m using Windows, which you can easily install by running through a regular old installer. Things may run slightly different on other systems, but it should be the same basic setup. If you need help, check Privoxy’s installation page.
After you’ve installed Privoxy, launch the application. (If you’re running a firewall, you may need to give it access to open a port.) In Windows, Privoxy loads as a blank window. Don’t worry, that doesn’t mean it isn’t working. In fact, you can close this window; Privoxy will still be running in your system tray.
Now it’s time to configure Privoxy to shuttle traffic through your Hamachi setup, so right-click Privoxy in the system tray and select Edit > Main Configuration. Notepad will open with a text file called config.txt; this is Privoxy’s main configuration file. Press Ctrl+f and search for listen-address 127.0.0.1:8118. Comment out that code by entering # in front of it, then paste listen-address followed by the IP address created by Hamachi. You can see, for example, that my proxy is set to listen-address 5.xxx.xxx.xx:8118. Save config.txt and restart Privoxy.
Step 3: Set Up Your Web Browser to Use Your New Secure Proxy
Now you just need to set your browser to use the secure Hamachi+Privoxy proxy you’ve set up so far. This last step varies by browser, but I’ll walk through setting it up on Chrome or Firefox.
- Install the Proxy Switchy extension. Once installed, it should automatically open a new tab with its options. (If it doesn’t, right-click the Proxy Switchy icon in your toolbar and select Options.)
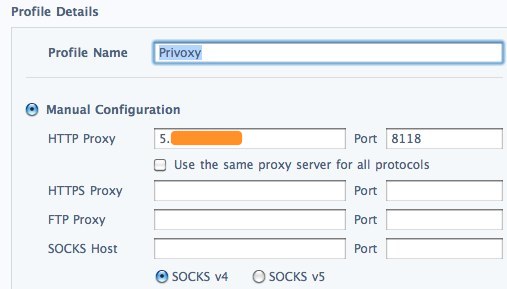
- Enter a profile name — something like Privoxy.
- In the HTTP Proxy box under Manual Configuration, enter the Hamachi VPN IP address to the computer where you set up your proxy. Set the port to 8118. (Remember that you need Hamachi running on both computers when you want to use this proxy, and you can get the IP of any other computer on your Hamachi network by right-clicking the computer name and selecting Copy address.)
- Click Save and you’re done.
Whenever you want to browse using your secure proxy — whenever you hit your coffee shop, for example — just click the Proxy Switchy icon in Chrome, then select your Privoxy connection.
On Firefox
- Open your Firefox preferences, then click on the Advanced tab. Click the Network tab, then the Settings button next to “Configure how Firefox connects to the Internet”.
- Click Manual proxy configuration, then enter the IP address of your Hamachi-powered proxy server and 8118 as your port. (In my case, for example, I’d right click “Windows” in Hamachi and copy the address for the Windows computer.)
- Click OK.
Make Sure It’s Working
To test that Privoxy is working, you can simply point your browser to http://config.privoxy.org/. If it is, you’ll see a message like “This is Privoxy 3.0.17 on Windows (5.xxx.xxx.xx), port 8118, enabled.” If not, you’ll see a page that reads “Privoxy is not being used”. Also, if you’re on a public Wi-Fi connection and you navigate to something like WhatIsMyIP.com with your proxy turned off, you should see a different IP when you reload the page with your proxy turned on. (Essentially, when turned on, your home’s public IP address should be showing.)
And that’s all there is to it. If may sound a touch complicated, but it’s an extremely useful thing to have set up. And remember, even though your proxy is running over an HTTP connection, Hamachi is encrypting everything that runs between your computers, so it’s still a secure option. Also keep in mind: This is far from the only way to accomplish this task. You could, for example, set up an SSH SOCKS proxy to encrypt your browsing. I like this method because it’s relatively simple to set up, and so far, it’s worked like a charm for me. If you’ve got your own favourite alternative, let’s hear about it in the comments.
Republished from Lifehacker